Love this? Save it for later!
Share the inspiration with your friends
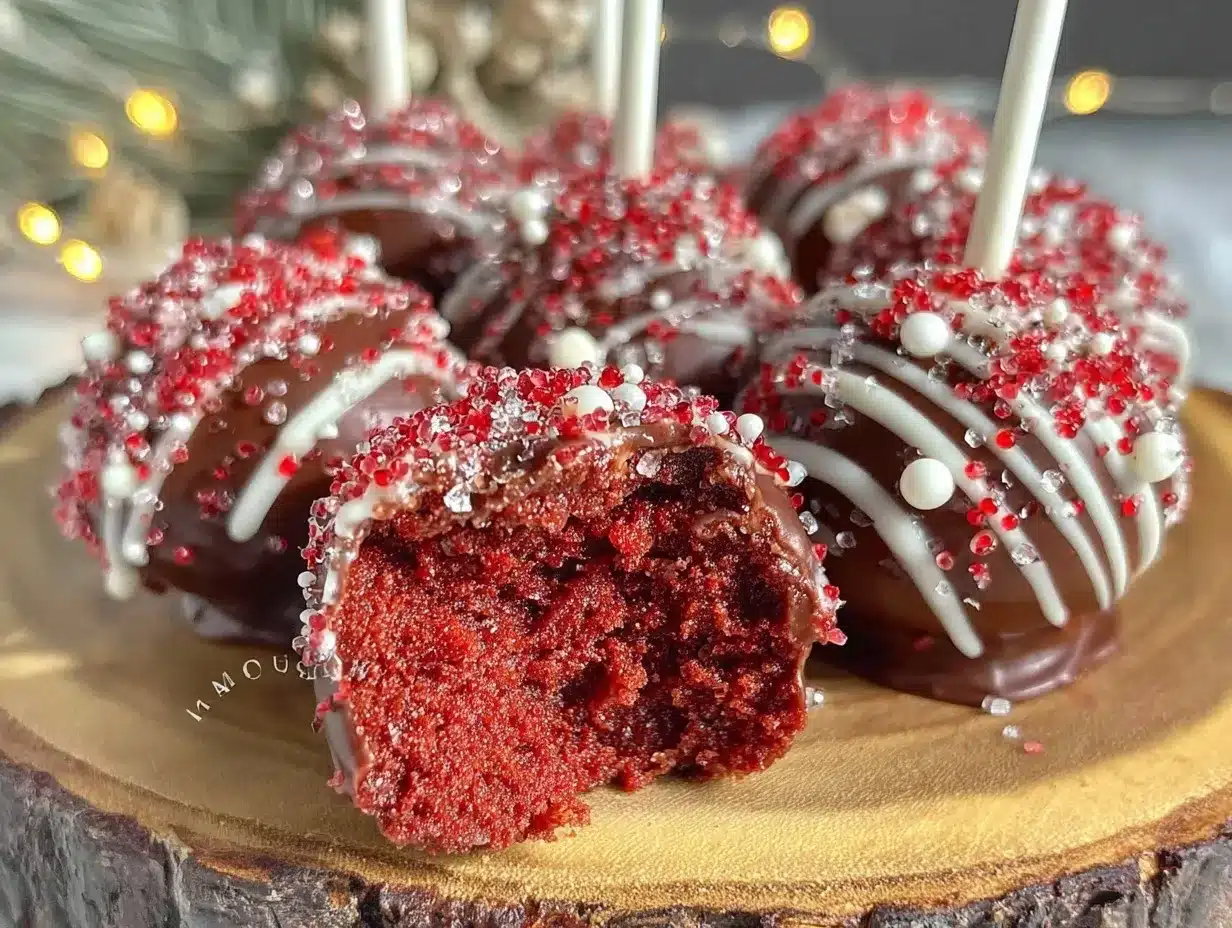
“I wasn’t planning on making anything fancy that day,” I remember telling myself as I rummaged through my pantry. It was a late Thursday afternoon, and honestly, I was just trying to whip up a quick snack before the neighborhood kids arrived for their after-school chaos. But then, out of nowhere, my mind latched onto the idea of cake pops—something festive, fun, and just the right amount of sweet to brighten up a dreary week. These Firecracker Red Velvet Cake Pops were born from that spontaneous whim, with a bit of a messy kitchen moment when I accidentally spilled red food coloring everywhere (don’t ask how!).
The thing is, these cake pops aren’t just pretty little treats. They have this amazing way of reminding me of those summer block parties where everyone’s gathered outside, kids running around with faces painted, and laughter spilling into the warm evening air. The bold red velvet paired with a crunchy sugar coating is like a mini celebration in every bite. Maybe you’ve been there too—looking for a dessert that’s easy to share, visually stunning, and downright delicious without all the fuss.
What makes these firecracker cake pops stand out isn’t just the vibrant color or the festive sprinkles; it’s the way the cream cheese frosting melts into the cake crumb, creating that perfect balance of moist and tangy. Plus, they’re surprisingly simple to make, which means you can impress friends (or just treat yourself) without breaking a sweat. Honestly, once I started making these, I couldn’t stop. It’s the kind of recipe that sticks with you, the kind that pops up whenever you need a little burst of joy in your kitchen.
Why You’ll Love This Recipe
After testing this recipe more times than I can count (and yes, sampling the occasional ‘oops’ batch), I’m confident these Firecracker Red Velvet Cake Pops will quickly become your go-to festive treat. Here’s why:
- Quick & Easy: These pops come together in under 45 minutes, making them perfect for last-minute parties or when you’re craving something sweet but don’t want to spend hours.
- Simple Ingredients: You probably have most of the ingredients on hand—no fancy or obscure items needed.
- Perfect for Festive Occasions: Whether it’s a Fourth of July BBQ, holiday party, or birthday bash, these pops bring the right amount of color and fun.
- Crowd-Pleaser: Kids and adults alike rave about them. The balance of cream cheese and cake is a total winner.
- Unbelievably Delicious: The texture is moist and tender inside with a slight crunch on the outside from the candy coating and sprinkles—honestly, it’s magic.
This isn’t just another cake pop recipe. The secret lies in blending the cream cheese frosting just right to bind the cake crumbs without overpowering the flavor. Plus, the touch of a firecracker-inspired candy coating adds that playful crunch and spark. I’ve tried versions with plain chocolate or vanilla coatings, but trust me, the red velvet combined with this festive finish is where it’s at.
For anyone who’s wondered if cake pops can be both simple and show-stopping, this recipe answers with a big, sweet YES. Plus, it’s a fun way to make every gathering feel a little more special without complicated steps or hours of baking. Ready to make some memories (and maybe a little mess) in the kitchen? Let’s get started.
What Ingredients You Will Need
This recipe uses straightforward, wholesome ingredients that come together beautifully to create bold flavor and a satisfying texture. Most are pantry staples, and substitutions are easy if needed.
- For the Cake Base:
- All-purpose flour – 1 ½ cups (180g), sifted for lightness
- Granulated sugar – 1 cup (200g), for sweetness
- Unsweetened cocoa powder – 2 tbsp (use high-quality for best flavor)
- Baking soda – 1 tsp
- Salt – ½ tsp
- Buttermilk – 1 cup (240ml), room temperature (substitute with milk + 1 tbsp vinegar if needed)
- Vegetable oil – ½ cup (120ml), adds moisture
- Large egg – 1, room temperature
- Red food coloring – 2 tbsp (gel type works best for vibrant color)
- Vanilla extract – 1 tsp (I like Nielsen-Massey for pure taste)
- Distilled white vinegar – 1 tsp, enhances red velvet tang
- For the Cream Cheese Frosting:
- Cream cheese – 8 oz (225g), softened (look for full-fat for best texture)
- Unsalted butter – ¼ cup (57g), softened
- Powdered sugar – 2 cups (240g), sifted to avoid lumps
- Vanilla extract – 1 tsp
- For the Coating & Decoration:
- White chocolate or candy melts – 12 oz (340g), melted (Wilton candy melts are a favorite)
- Red, white, and blue sprinkles – ½ cup, for that festive firecracker look
- Wooden lollipop sticks – 25-30 pieces
For gluten-free options, swapping all-purpose flour with a 1:1 gluten-free baking flour blend works well. If you prefer dairy-free, try coconut cream cheese and vegan butter substitutes. I once swapped the sprinkles for crushed peppermint candies in winter, and that turned out surprisingly festive too!
Equipment Needed
- Mixing bowls – at least two (one for dry and one for wet ingredients)
- Electric mixer or stand mixer – makes frosting and cake mixing easier, but a sturdy whisk works if you’re patient
- Measuring cups and spoons – for precise ingredient amounts
- Baking pan – 9×9 inch (23×23 cm) square pan or equivalent round pan
- Cooling rack – to let the cake cool evenly before crumbling
- Large mixing bowl – for combining cake crumbs and frosting
- Baking sheet lined with parchment paper – for setting cake pops
- Microwave-safe bowl – for melting chocolate or candy melts
- Lollipop sticks – wooden or plastic, readily available online or at craft stores
- Optional: Candy thermometer – if you want to melt chocolate carefully without burning
Personally, I started making cake pops with just a hand mixer and a microwave, and it worked fine. But investing in a good stand mixer made frosting prep much smoother. If you don’t have lollipop sticks, you can use sturdy straws or even toothpicks for mini pops. Just be careful when handling!
Preparation Method
- Preheat and Prep: Preheat your oven to 350°F (175°C). Grease and flour your baking pan or line it with parchment paper to prevent sticking. This takes about 10 minutes.
- Mix Dry Ingredients: In a medium bowl, sift together 1 ½ cups flour, 1 cup sugar, 2 tbsp cocoa powder, 1 tsp baking soda, and ½ tsp salt. Whisk to combine evenly.
- Combine Wet Ingredients: In a separate bowl, whisk 1 cup buttermilk, ½ cup vegetable oil, 1 large egg, 2 tbsp red food coloring, 1 tsp vanilla extract, and 1 tsp vinegar until smooth. This usually takes about 2-3 minutes.
- Make the Batter: Gradually add the dry ingredients to the wet mixture, folding gently but thoroughly. Avoid overmixing to keep the cake tender. The batter should be smooth and vibrant red.
- Bake: Pour batter into your prepared pan and bake for 25-30 minutes, or until a toothpick inserted in the center comes out clean. The kitchen will smell like a cozy bakery—watch out!
- Cool Completely: Let the cake cool fully on a wire rack, about 1 hour. This step is crucial for easy crumbling.
- Make the Frosting: Beat softened cream cheese and butter with an electric mixer until smooth and creamy. Gradually add powdered sugar and 1 tsp vanilla, beating until fluffy and spreadable.
- Crumble Cake: Break the cooled cake into fine crumbs in a large bowl. You want no large chunks—think sand-like texture.
- Combine Cake and Frosting: Add ½ cup of frosting to the crumbs and mix until the mixture holds together when pressed. Add more frosting a tablespoon at a time if needed, but don’t overdo it or the pops will be too soft.
- Form Cake Pops: Scoop out tablespoon-sized portions and roll into balls. Place them on a parchment-lined baking sheet. Refrigerate for 20 minutes to firm up.
- Prepare Coating: Melt white chocolate or candy melts in a microwave-safe bowl in 30-second bursts, stirring in between, until smooth.
- Insert Sticks: Dip the tip of each lollipop stick into melted chocolate, then gently insert halfway into each cake ball. This ‘glue’ helps secure the stick.
- Coat Cake Pops: Dip each cake pop into the melted coating, letting excess drip off. Before the coating sets, sprinkle with red, white, and blue sprinkles for that firecracker effect.
- Set and Serve: Stick the finished pops upright in a styrofoam block or stand and refrigerate until the coating hardens, about 30 minutes.
Pro tip: If your coating is too thick, add a teaspoon of vegetable oil to thin it out. Also, working quickly helps prevent the coating from setting before you add sprinkles. I learned this the hard way after a few sticky fingers incidents!
Cooking Tips & Techniques
Making cake pops might seem straightforward, but there are a few tricks that make a huge difference in texture and appearance.
- Don’t Skip Cooling: Fully cooling the cake is essential. Warm crumbs will make the mixture too sticky and hard to shape.
- Right Frosting Ratio: Adding too much frosting can make the cake pops too soft and prone to falling apart. Start small and add more only if needed.
- Use Gel Food Coloring: It provides vibrant color without watering down your batter like liquid food colorings might.
- Temperature Control: Melt candy coating gently and keep it warm but not hot. Overheated coating can seize and ruin your smooth finish.
- Chill Between Steps: Refrigerate cake balls before dipping to prevent crumbling and help the coating set nicely.
- Stick Stability: Don’t skip dipping the stick tip in chocolate before inserting into the cake ball. This little step keeps everything together.
- Multitasking: Prepare your sprinkles and set up a dipping station before starting to coat. This way, you can work quickly and avoid messy delays.
Honestly, my first batch was a bit of a disaster—uneven pops, cracked coatings, and more sprinkles on the floor than on the cakes. But each batch got better, and I’m sure you’ll find your rhythm quickly once you try these tips.
Variations & Adaptations
Want to switch things up? Here are some ideas that add fun new flavors or accommodate dietary needs:
- Chocolate Lover’s Version: Mix in mini chocolate chips into the cake crumb mixture before forming pops for an extra surprise.
- Gluten-Free Adaptation: Use a gluten-free flour blend and ensure your baking powder is gluten-free. The texture stays moist and delicious.
- Seasonal Twist: Swap out the red velvet for pumpkin spice cake in the fall, and use orange and brown sprinkles instead of red, white, and blue.
- Dairy-Free Option: Substitute cream cheese with dairy-free cream cheese and use coconut oil-based candy melts.
- Nutty Crunch: Roll the coated cake pops in crushed toasted pecans or almonds instead of sprinkles for a sophisticated touch.
I once tried a peppermint version during the holidays by adding crushed candy canes on the coating. It was a hit—kids loved the extra crunch and festive look. Feel free to get creative depending on your occasion!
Serving & Storage Suggestions
These Firecracker Red Velvet Cake Pops are best served chilled or at room temperature. The coating is crisp when cold but softens a bit as they warm, which is honestly delightful.
For presentation, arrange them standing upright in a decorated styrofoam block or a festive vase filled with colored sugar or candy. They make a fantastic centerpiece for parties or potlucks.
Store cake pops in an airtight container in the refrigerator for up to 5 days. If you want to keep them longer, freeze them wrapped individually in plastic wrap and placed in a freezer-safe container—freeze for up to 2 months.
To reheat, let frozen pops thaw in the fridge for several hours or overnight. Avoid microwaving, as it will melt the coating and ruin the texture.
Interestingly, the flavors deepen a bit after a day—so making them a day ahead can actually improve the taste and make your party prep easier.
Nutritional Information & Benefits
Each cake pop contains approximately 180-220 calories, depending on size and coating. They provide a modest amount of protein from the eggs and cream cheese, and some calcium from dairy ingredients.
Red velvet cake’s key ingredients like cocoa powder contain antioxidants, and the cream cheese adds a creamy texture with some vitamin A. Of course, this is a treat, so moderation is key!
This recipe can be adapted to lower sugar or gluten-free versions if you prefer, making it approachable for many dietary preferences. Just be mindful of allergens like dairy and gluten if serving to guests.
Personally, I love that these cake pops bring a little indulgence without overdoing it—perfect for celebrations when you want to enjoy something sweet but not feel weighed down.
Conclusion
If you’re looking for a festive treat that’s as fun to make as it is to eat, these Firecracker Red Velvet Cake Pops fit the bill perfectly. They’re simple, colorful, and delicious with just the right balance of sweetness and tang.
Feel free to tweak the flavors or decorations to suit your style—this recipe is forgiving and flexible, which makes it a keeper in my kitchen. I keep coming back to it for celebrations, casual get-togethers, or simply when I want a little pop of joy in my day.
Give it a try, and let me know how your firecracker pops turn out! Share your tweaks, questions, or even your messy kitchen stories—I love hearing from fellow bakers.
Here’s to festive treats and making moments sweeter, one bite at a time.
FAQs
How long do Firecracker Red Velvet Cake Pops last?
Stored in an airtight container in the fridge, these cake pops last about 5 days. For longer storage, freeze them wrapped individually for up to 2 months.
Can I make these cake pops without cream cheese frosting?
You can try using buttercream frosting instead, but cream cheese gives that classic red velvet tang and moisture that’s hard to replicate with other frostings.
What’s the best way to prevent cake pops from falling off the sticks?
Dip the stick tip in melted chocolate before inserting it into the cake ball. This ‘glue’ helps secure the pop and prevent it from sliding off.
Can I use boxed red velvet cake mix?
Yes! Boxed mixes work fine and save time. Just crumble the baked cake and mix with cream cheese frosting as usual.
How do I fix cracked coating on cake pops?
Make sure the cake pops are well chilled before dipping and that your candy melts are at the right temperature—not too hot or too cool. Adding a little vegetable oil to the melted coating can also help it set smoothly.
By the way, if you enjoy creating festive treats, you might appreciate the fun techniques in my crispy garlic chicken post or the sweet simplicity of classic vanilla cupcakes.
Pin This Recipe!

Firecracker Red Velvet Cake Pops
These Firecracker Red Velvet Cake Pops are festive, fun, and delicious treats featuring moist red velvet cake combined with tangy cream cheese frosting and a crunchy candy coating. Perfect for parties and easy to make in under 45 minutes.
- Prep Time: 15 minutes
- Cook Time: 30 minutes
- Total Time: 45 minutes
- Yield: 25-30 cake pops 1x
- Category: Dessert
- Cuisine: American
Ingredients
- 1 ½ cups all-purpose flour (180g), sifted
- 1 cup granulated sugar (200g)
- 2 tbsp unsweetened cocoa powder
- 1 tsp baking soda
- ½ tsp salt
- 1 cup buttermilk (240ml), room temperature (or milk + 1 tbsp vinegar)
- ½ cup vegetable oil (120ml)
- 1 large egg, room temperature
- 2 tbsp red food coloring (gel type preferred)
- 1 tsp vanilla extract
- 1 tsp distilled white vinegar
- 8 oz cream cheese (225g), softened
- ¼ cup unsalted butter (57g), softened
- 2 cups powdered sugar (240g), sifted
- 1 tsp vanilla extract
- 12 oz white chocolate or candy melts (340g), melted
- ½ cup red, white, and blue sprinkles
- 25–30 wooden lollipop sticks
Instructions
- Preheat oven to 350°F (175°C). Grease and flour a 9×9 inch baking pan or line with parchment paper.
- In a medium bowl, sift together flour, sugar, cocoa powder, baking soda, and salt. Whisk to combine.
- In a separate bowl, whisk buttermilk, vegetable oil, egg, red food coloring, vanilla extract, and vinegar until smooth.
- Gradually fold dry ingredients into wet mixture until smooth and vibrant red. Avoid overmixing.
- Pour batter into prepared pan and bake for 25-30 minutes or until a toothpick inserted in the center comes out clean.
- Cool cake completely on a wire rack, about 1 hour.
- Beat cream cheese and butter with an electric mixer until smooth and creamy. Gradually add powdered sugar and vanilla, beating until fluffy.
- Crumble cooled cake into fine crumbs in a large bowl.
- Add ½ cup frosting to crumbs and mix until mixture holds together when pressed. Add more frosting if needed, but do not overdo.
- Scoop tablespoon-sized portions and roll into balls. Place on parchment-lined baking sheet and refrigerate for 20 minutes.
- Melt white chocolate or candy melts in microwave-safe bowl in 30-second bursts, stirring until smooth.
- Dip tip of each lollipop stick into melted chocolate, then insert halfway into each cake ball to secure.
- Dip each cake pop into melted coating, letting excess drip off. Sprinkle with red, white, and blue sprinkles before coating sets.
- Place cake pops upright in a styrofoam block or stand and refrigerate until coating hardens, about 30 minutes.
Notes
Fully cool the cake before crumbling to avoid sticky mixture. Use gel food coloring for vibrant color without watering down batter. Dip stick tips in melted chocolate before inserting to secure pops. Add a teaspoon of vegetable oil to melted coating if too thick. Work quickly when coating to prevent premature setting. Refrigerate cake balls before dipping to prevent crumbling.
Nutrition
- Serving Size: 1 cake pop
- Calories: 200
- Sugar: 20
- Sodium: 150
- Fat: 11
- Saturated Fat: 6
- Carbohydrates: 26
- Fiber: 1
- Protein: 3
Keywords: red velvet cake pops, firecracker cake pops, festive treats, easy cake pops, cream cheese frosting, party desserts