Love this? Save it for later!
Share the inspiration with your friends
I was elbow-deep in cookie dough last Tuesday when my neighbor’s cat, a sleek little shadow named Binx, jumped onto my windowsill and pressed his face against the glass. The flour-dusted windowpane turned his black fur into something ghostly and magical—and I froze, mid-knead, with a ridiculous grin spreading across my face. That’s when the idea hit me like a sugar rush. Why had I never thought to make black cat sugar cookies for Halloween before?
Honestly, I’d been searching for the perfect Halloween treat that wasn’t the same old pumpkin shapes or spiderweb designs. You know how it goes—you scroll through Pinterest for an hour, see a thousand versions of the same thing, and feel your inspiration fizzle out. But that moment with Binx? It stuck. I spent the next three days in my tiny kitchen, testing dough recipes until my butter supply ran dangerously low, trying to capture that exact feeling of a cat peering at you from the shadows.
The first batch came out looking more like blobs with ears—honestly, it was a little tragic. I may have cried into my mixing bowl for a solid minute. But the second batch? Something clicked. I figured out the right dough consistency, the perfect chilling time, and a little trick with the eyes that made them look mischievous rather than terrifying. By the time I pulled that tray from the oven, I knew these black cat sugar cookies were going to be my Halloween tradition forever.
There’s something about these cookies that makes people smile in that soft, delighted way. Maybe you’ve been there—looking for that one Halloween recipe that feels special without requiring a pastry degree. These cookies are that recipe. They’re the kind of treat that makes kids gasp and adults reach for their phones to take pictures. And honestly, they taste even better than they look.
Why You’ll Love These Black Cat Sugar Cookies
Let me tell you why these black cat sugar cookies have earned a permanent spot in my Halloween rotation—and why they’ll become your go-to treat too.
- Simple Ingredients, Stunning Results: You probably have everything in your pantry right now. No weird extracts, no specialty gels, no hunting through three grocery stores. Just butter, sugar, flour, and a few basic pantry staples.
- Kid-Friendly Fun: My niece helped me decorate an entire batch last weekend, and let me tell you—her cats looked like they’d been through a windstorm, and they were somehow the cutest ones on the tray. This recipe is forgiving enough for little hands.
- Make-Ahead Magic: The dough chills beautifully for up to three days, and baked cookies freeze like a dream. You can prep these black cat sugar cookies days before your Halloween party without stressing.
- Crowd-Pleasing Charm: I brought a plate to my book club last week, and three people asked for the recipe before the discussion even started. These cookies have a way of stealing the spotlight.
- Endlessly Customizable: Want green eyes instead of yellow? Go for it. Feeling ambitious and want to add little witch hats? You can totally do that. The base recipe is a canvas for your imagination.
What makes these black cat sugar cookies different from every other Halloween cookie out there is the texture. I spent weeks perfecting this dough—it’s sturdy enough to hold those delicate cat ear shapes without spreading into blobs, but it stays tender and buttery on the inside. No dry, crumbly cookies here. Each bite has that perfect snap on the edges and softness in the center that makes sugar cookies absolutely irresistible.
These cookies aren’t just cute—they’re the kind of treat that makes people close their eyes after the first bite. It’s comfort food dressed up in a Halloween costume, and honestly, isn’t that the best kind of holiday baking?
What Ingredients You Will Need
This recipe uses simple, wholesome ingredients to create black cat sugar cookies with bold flavor and satisfying texture. Most of these are pantry staples you likely already have on hand.
For the Cookie Dough
- Unsalted butter, softened (1 cup / 226g) – I prefer using Land O’Lakes for consistent results. Make sure it’s truly softened to room temperature, not melted. This is crucial for proper creaming.
- Granulated sugar (1 cup / 200g) – Regular white sugar gives these cookies their classic sweetness and helps with that tender crumb.
- Large egg, room temperature (1) – Cold eggs can seize up your butter mixture, so let yours sit out for 30 minutes first.
- Pure vanilla extract (2 teaspoons) – I’m partial to Nielsen-Massey, but any good-quality vanilla works. Don’t use imitation here—the flavor difference is noticeable.
- All-purpose flour (2 ½ cups / 312g) – Spoon and level your flour for accuracy. Scooping directly from the bag packs in too much flour and makes cookies dry.
- Baking powder (1 teaspoon) – Make sure yours isn’t expired. Fresh baking powder makes a noticeable difference in spread and lift.
- Salt (½ teaspoon) – Fine sea salt is my go-to. It balances the sweetness without making the cookies taste salty.
- Black food coloring gel (1-2 teaspoons) – Liquid food coloring won’t give you that deep, dark black. I recommend Americolor Super Black gel for the richest color.
For the Royal Icing
- Powdered sugar (2 cups / 240g) – Sift it first to avoid lumpy icing. Trust me on this one.
- Meringue powder (1 ½ tablespoons) – This gives the icing structure and a nice matte finish. Wilton brand works great.
- Warm water (3-4 tablespoons) – Add slowly. You can always add more, but you can’t take it out.
- Black food coloring gel (½ teaspoon) – For the base icing color.
- Yellow food coloring gel (for the eyes) – A tiny dab goes a long way.
- White decorating icing (for whiskers and highlights) – A tube of pre-made white icing works perfectly for detail work.
Ingredient Selection Tips
When choosing your black food coloring, look for gels labeled “super black” or “extra black.” Regular black coloring can turn out gray or muddy, especially after baking. I learned this the hard way with a batch that looked more like sad charcoal blobs than elegant black cat sugar cookies.
For the butter, European-style butter like Kerrygold gives an even richer flavor, but standard American butter works beautifully too. Just avoid margarine or spreads—they have too much water content and will make your cookies spread into pancakes.
Equipment Needed
- Cat-shaped cookie cutter (about 3 inches wide) – I found mine at a kitchen supply store for $4. Amazon has plenty of options too. If you can’t find one, you can trace a template onto cardboard and cut around it with a knife.
- Stand mixer or hand mixer – Either works. I use my KitchenAid for the creaming step, but a hand mixer and a sturdy bowl do the job just fine.
- Baking sheets (2-3) – Light-colored aluminum sheets give the most even browning. Dark sheets can over-brown the bottoms.
- Parchment paper or silicone baking mats – Non-negotiable for even baking and easy cleanup.
- Rolling pin with thickness guides – This was a game-changer for my cookie consistency. The adjustable rings ensure every cookie is the same thickness.
- Piping bags with small round tips – For the royal icing details. If you don’t have piping bags, a small zip-top bag with the corner snipped off works perfectly.
- Cooling racks – Essential for letting cookies cool completely before decorating.
- Offset spatula – Makes transferring cookies from counter to baking sheet much easier.
If you’re just starting out, don’t feel pressured to buy everything at once. I decorated my first batch of black cat sugar cookies using a butter knife and a sandwich bag, and they still turned out adorable. The fancy tools just make the process smoother.
Preparation Method
- Cream the butter and sugar (5 minutes) – In your mixing bowl, beat the softened butter and granulated sugar together on medium speed until light, fluffy, and pale in color. Scrape down the sides of the bowl halfway through. You’re looking for a texture that’s almost like whipped frosting.
- Add the wet ingredients (2 minutes) – Beat in the egg and vanilla extract until fully combined. The mixture should look smooth and glossy. Add your black food coloring gel now—start with 1 teaspoon and mix thoroughly before deciding if you need more. I usually end up using about 1 ½ teaspoons for that deep, moody black.
- Mix the dry ingredients (3 minutes) – In a separate bowl, whisk together the flour, baking powder, and salt. Gradually add this to the wet mixture on low speed, mixing just until the dough comes together. Stop as soon as you don’t see any more streaks of flour. Overmixing here makes tough cookies.
- Chill the dough (1 hour minimum) – Divide the dough in half, flatten each half into a disc about 1 inch thick, wrap tightly in plastic wrap, and refrigerate for at least 1 hour. This step is absolutely mandatory. Warm dough spreads like crazy and your cat shapes will lose their ears. I once skipped this step because I was impatient, and my black cat sugar cookies came out looking like shapeless blobs with tiny nubs.
- Preheat and prepare (10 minutes) – Preheat your oven to 350°F (175°C). Line your baking sheets with parchment paper or silicone mats.
- Roll and cut (15 minutes) – Lightly flour your work surface and rolling pin. Roll one disc of dough to ¼-inch thickness. If the dough starts sticking, dust with a little more flour. Cut out your cat shapes and transfer them to the prepared baking sheets, spacing them about 2 inches apart. Gather the scraps, re-roll, and cut more cookies.
- Chill again (15 minutes) – Pop the baking sheets with the cut-out cookies into the refrigerator for 15 minutes before baking. This second chill prevents spreading and keeps those ears sharp and pointy.
- Bake (8-10 minutes) – Bake one sheet at a time in the center of the oven. The cookies are done when the edges are just barely set and the tops look dry. They won’t brown much since they’re black, so watch the time carefully. My first batch overbaked by just 2 minutes and turned into crunchy disappointment.
- Cool completely (20 minutes) – Let the cookies cool on the baking sheet for 5 minutes, then transfer to a wire rack to cool completely. Don’t even think about decorating warm cookies—the icing will slide right off.
- Prepare the royal icing (10 minutes) – In a clean bowl, combine the powdered sugar and meringue powder. Add 3 tablespoons of warm water and beat on low speed until combined, then on medium-high for 4-5 minutes until the icing is glossy and forms stiff peaks. Add more water a teaspoon at a time if needed. Stir in black food coloring until you reach your desired shade.
- Decorate the cookies (30-60 minutes) – Transfer the black icing to a piping bag fitted with a small round tip. Outline each cookie, then flood the inside with more icing. Use a toothpick to spread the icing into corners and pop any air bubbles. Let the base icing dry completely—about 2 hours. Then add yellow icing dots for eyes, white icing for whiskers and highlights, and any other details you want.
Sensory cues to watch for: When the dough is properly chilled, it should feel firm but not rock-hard. When you press a finger into it, it should leave a slight indent. The baked cookies should feel firm around the edges but still slightly soft in the center when you touch them. The royal icing should hold a ribbon trail on the surface when you lift the whisk.
Cooking Tips & Techniques
Let me save you from the mistakes I made during my first dozen batches of black cat sugar cookies. Because honestly, I’ve messed up every possible step at least once.
Temperature is everything. I cannot stress this enough. If your butter is too soft, your dough will be sticky and your cookies will spread. If your oven runs hot, your cookies will overbake before you realize it. I keep an oven thermometer inside my oven at all times because my built-in temperature gauge is a liar. Most home ovens run 25-50 degrees off from what they display.
Chill between every step. I know it’s annoying to wait, but chilling the dough before rolling, after cutting, and even between decorating layers makes a massive difference. The colder your dough, the sharper your cookie shapes. I’ve learned to embrace the chill time as a chance to clean up my disaster of a kitchen.
Go slow with the black coloring. Black food coloring is potent, and it’s easy to overdo it. Add it drop by drop, mixing thoroughly between additions. Too much coloring can make the dough taste slightly bitter and can also affect the texture. I learned this when a batch of my black cat sugar cookies tasted faintly like chemicals—not my finest moment.
Use a light touch with flour. When rolling out your dough, use just enough flour to prevent sticking. Too much flour on the surface gets incorporated into the dough and makes cookies dry and crumbly. I keep a small bowl of flour nearby and dip my rolling pin in it rather than dusting the whole surface.
Bake one sheet at a time. I know it takes longer, but baking two sheets at once leads to uneven browning and inconsistent results. The bottom sheet will always be less done than the top one. Your patience will be rewarded with perfectly uniform black cat sugar cookies.
Variations & Adaptations
One of the best things about this recipe is how flexible it is. Here are some variations I’ve tried and loved.
Gluten-Free Version: Substitute the all-purpose flour with a 1:1 gluten-free baking flour blend that contains xanthan gum. I’ve had great results with Bob’s Red Mill 1-to-1 Baking Flour. The dough will be slightly more fragile, so handle it gently and chill it extra long. Your gluten-free friends will thank you.
Vegan Black Cat Sugar Cookies: Use vegan butter sticks (not spreadable margarine) and replace the egg with a flax egg (1 tablespoon ground flaxseed mixed with 3 tablespoons water, let sit for 5 minutes). For the royal icing, skip the meringue powder and use aquafaba (chickpea liquid) instead—3 tablespoons of aquafaba whipped to stiff peaks replaces the egg whites perfectly.
Spiced Halloween Variation: Add 1 teaspoon of cinnamon and ½ teaspoon of nutmeg to the dry ingredients for a cozy fall twist. The spices pair beautifully with the vanilla and give the cookies a warm, aromatic quality that screams autumn. I made this version for a Halloween potluck and they disappeared in minutes.
Different Cat Expressions: Play around with the eye shapes and positions to give each cookie its own personality. Angry eyes, sleepy eyes, surprised eyes—each black cat sugar cookie can have its own mood. My niece spent an hour making a whole family of cats with different expressions, and they were the cutest thing I’ve ever seen.
Chocolate Cat Cookies: Replace ¼ cup of the flour with unsweetened cocoa powder for a chocolate version that’s even darker and richer. These taste amazing with a dusting of powdered sugar for a “ghost cat” effect.
Serving & Storage Suggestions
These black cat sugar cookies are best served at room temperature, and they look absolutely stunning arranged on a dark platter or cake stand. For Halloween parties, I like to arrange them in a circle with a small pumpkin or candle in the center. The contrast between the black cookies and a bright orange or white serving dish is striking.
Storage Instructions: Store undecorated cookies in an airtight container at room temperature for up to 1 week. If you’ve decorated them with royal icing, let the icing dry completely—usually overnight—before stacking them between layers of parchment paper. I learned this the hard way when I stacked slightly damp cookies and ended up with a tragic, stuck-together mess.
Freezing Tips: You can freeze the unbaked cookie dough discs, wrapped tightly in plastic wrap and placed in a freezer bag, for up to 3 months. Thaw overnight in the refrigerator before rolling and cutting. Baked, undecorated cookies also freeze beautifully for up to 2 months. Just thaw at room temperature before decorating.
Reheating: These cookies are meant to be eaten at room temperature, but if you want that fresh-from-the-oven warmth, pop them in a 300°F oven for 3-4 minutes. Don’t microwave them—the icing will get sticky and the texture will turn rubbery.
Flavor Development: Here’s a little secret—these black cat sugar cookies actually taste better the day after baking. The flavors meld together and the texture softens slightly. If you can resist eating them all on day one, you’re in for a treat on day two.
Nutritional Information & Benefits
Each black cat sugar cookie (based on a recipe yielding 24 cookies) contains approximately:
- Calories: 145
- Total Fat: 6g
- Saturated Fat: 4g
- Carbohydrates: 22g
- Sugar: 14g
- Protein: 1g
- Sodium: 55mg
While these are certainly a treat rather than a health food, they do offer some small benefits. The butter provides a source of vitamin A, and the simple ingredients mean you’re avoiding the preservatives and artificial additives found in store-bought cookies. Plus, there’s something to be said for the mental health benefits of baking—the rhythmic process of creaming, rolling, and decorating can be genuinely meditative.
For those with dietary concerns, this recipe contains gluten, dairy, and eggs. The vegan and gluten-free variations I mentioned earlier work beautifully if you need alternatives.
I believe in balance—enjoying treats like these black cat sugar cookies as part of a varied diet, without guilt. Halloween comes once a year, and these cookies are worth every single calorie.
Frequently Asked Questions
Why did my black cat sugar cookies spread so much?
This is usually caused by dough that wasn’t chilled enough. Make sure you chill the dough for at least 1 hour before rolling, and then chill the cut-out cookies for 15 minutes before baking. If your kitchen is warm, pop the baking sheets in the refrigerator between batches.
Can I use liquid food coloring instead of gel?
You can, but I don’t recommend it. Liquid coloring adds extra moisture to the dough, which can affect the texture and cause spreading. You’ll also need a lot more liquid coloring to achieve a true black, which can make the dough sticky and the cookies taste slightly off. Gel coloring is worth the investment.
How do I get my black cat sugar cookies to look perfectly black?
The key is using a high-quality black gel food coloring and adding it in layers. Mix some into the dough, then add more to the royal icing. The color deepens slightly as the cookies sit, so don’t panic if they look a bit gray right after baking. Let them cool completely and the true color will emerge.
Can I make these cookies ahead of time for a party?
Absolutely! This is actually one of the best things about this recipe. You can make the dough up to 3 days ahead and keep it refrigerated. You can bake the cookies 1 week ahead and store them undecorated. Or you can fully decorate them 3-4 days before your event—just let the icing dry completely before storing.
My royal icing is too runny. How do I fix it?
Add more sifted powdered sugar, one tablespoon at a time, and mix thoroughly until the icing thickens. If it’s too thick, add water one drop at a time. The perfect consistency for flooding is when the icing flows off a spoon in a smooth ribbon and the ribbon disappears back into the surface within 10 seconds.
Conclusion
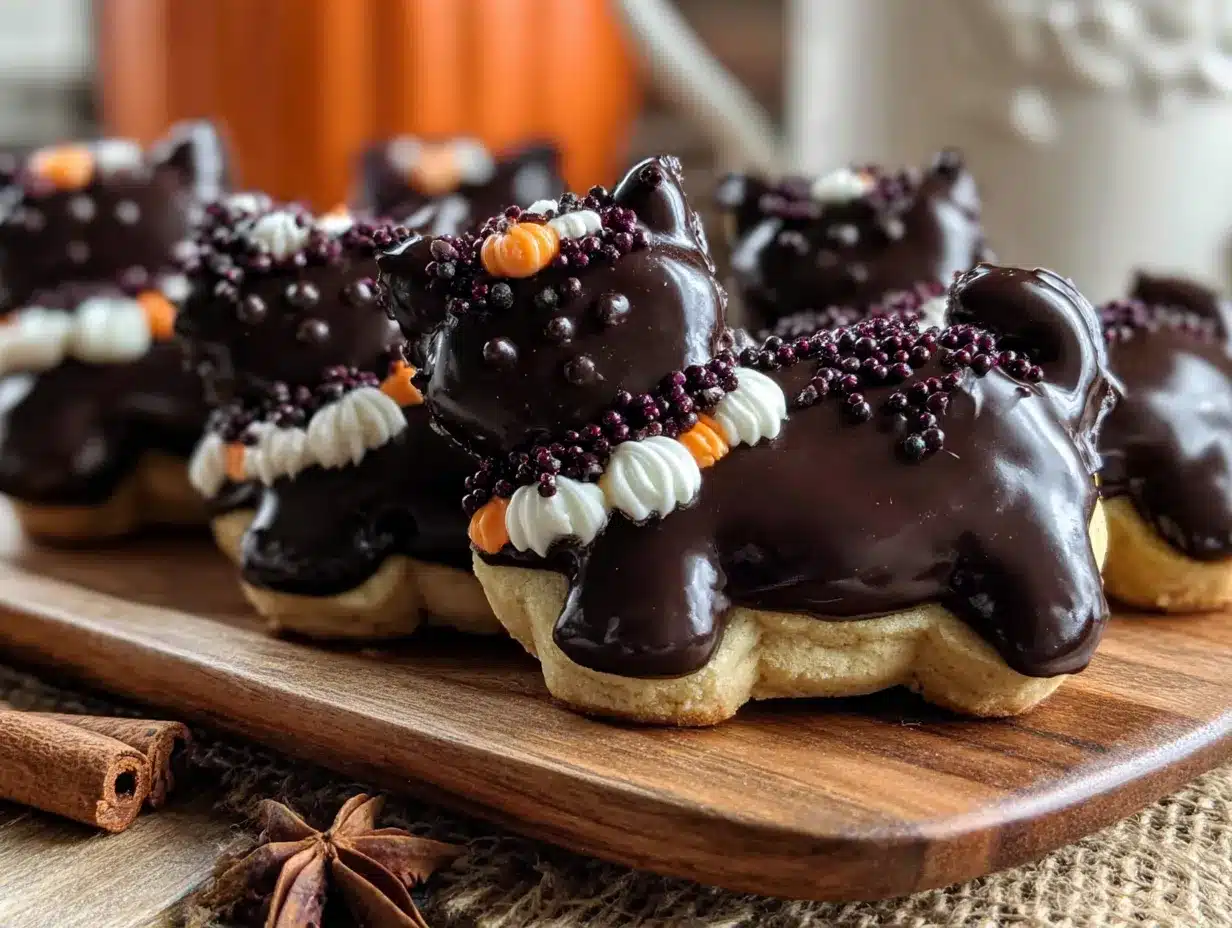
These black cat sugar cookies have become my favorite Halloween tradition, and I have a feeling they’ll become yours too. There’s something incredibly satisfying about pulling a tray of perfectly shaped cat faces from the oven, their little ears still sharp and their dark bodies gleaming. And when you add those bright yellow eyes and tiny whiskers? Pure magic.
I hope you’ll make these cookies your own—change the expressions, experiment with colors, get your kids or friends involved in the decorating process. The best recipes aren’t the ones you follow perfectly; they’re the ones that become part of your story. These black cat sugar cookies have certainly become part of mine.
When you make them—and I really hope you do—come back and tell me how they turned out. Did your cats have personality? Did anyone mistake them for real cats? Did you make up a silly name for your favorite cookie? I genuinely want to know. Drop a comment below, share a photo, or tag me in your Halloween baking adventures. Happy Halloween, and happy baking!
PrintAdorable Black Cat Sugar Cookies: Easy Halloween Treat

These black cat sugar cookies are the perfect Halloween treat with a tender, buttery texture and adorable cat shapes. Easy to make with simple ingredients, they’re kid-friendly, make-ahead, and endlessly customizable for your spooky celebrations.
- Prep Time: 1 hour 30 minutes
- Cook Time: 10 minutes
- Total Time: 2 hours 40 minutes
- Yield: 24 servings 1x
- Category: Dessert
- Cuisine: American
Ingredients
- 1 cup (226g) unsalted butter, softened
- 1 cup (200g) granulated sugar
- 1 large egg, room temperature
- 2 teaspoons pure vanilla extract
- 2 ½ cups (312g) all-purpose flour
- 1 teaspoon baking powder
- ½ teaspoon fine sea salt
- 1–2 teaspoons black food coloring gel
- 2 cups (240g) powdered sugar, sifted
- 1 ½ tablespoons meringue powder
- 3–4 tablespoons warm water
- ½ teaspoon black food coloring gel (for icing)
- Yellow food coloring gel (for eyes)
- White decorating icing (for whiskers and highlights)
Instructions
- Cream the butter and sugar: In your mixing bowl, beat the softened butter and granulated sugar together on medium speed until light, fluffy, and pale in color, about 5 minutes. Scrape down the sides of the bowl halfway through.
- Add the wet ingredients: Beat in the egg and vanilla extract until fully combined, about 2 minutes. The mixture should look smooth and glossy. Add black food coloring gel starting with 1 teaspoon and mix thoroughly; add more if needed (usually about 1 ½ teaspoons).
- Mix the dry ingredients: In a separate bowl, whisk together the flour, baking powder, and salt. Gradually add this to the wet mixture on low speed, mixing just until the dough comes together, about 3 minutes. Stop as soon as no streaks of flour remain.
- Chill the dough: Divide the dough in half, flatten each half into a disc about 1 inch thick, wrap tightly in plastic wrap, and refrigerate for at least 1 hour.
- Preheat and prepare: Preheat your oven to 350°F (175°C). Line your baking sheets with parchment paper or silicone mats.
- Roll and cut: Lightly flour your work surface and rolling pin. Roll one disc of dough to ¼-inch thickness. Cut out cat shapes with a cat-shaped cookie cutter and transfer to prepared baking sheets, spacing them about 2 inches apart. Gather scraps, re-roll, and cut more cookies.
- Chill again: Place the baking sheets with cut-out cookies in the refrigerator for 15 minutes before baking.
- Bake: Bake one sheet at a time in the center of the oven for 8-10 minutes. Cookies are done when edges are just barely set and tops look dry.
- Cool completely: Let cookies cool on the baking sheet for 5 minutes, then transfer to a wire rack to cool completely, about 20 minutes.
- Prepare the royal icing: In a clean bowl, combine powdered sugar and meringue powder. Add 3 tablespoons warm water and beat on low speed until combined, then on medium-high for 4-5 minutes until glossy and forms stiff peaks. Add more water a teaspoon at a time if needed. Stir in black food coloring.
- Decorate the cookies: Transfer black icing to a piping bag fitted with a small round tip. Outline each cookie, then flood the inside with more icing. Use a toothpick to spread icing into corners and pop air bubbles. Let base icing dry completely (about 2 hours). Add yellow icing dots for eyes, white icing for whiskers and highlights.
Notes
Chill dough thoroughly between steps to prevent spreading. Use high-quality black gel food coloring for best results. Cookies taste even better the day after baking. For vegan version, use vegan butter and flax egg; for gluten-free, use 1:1 gluten-free flour blend with xanthan gum.
Nutrition
- Serving Size: 1 cookie
- Calories: 145
- Sugar: 14
- Sodium: 55
- Fat: 6
- Saturated Fat: 4
- Carbohydrates: 22
- Protein: 1
Keywords: black cat sugar cookies, Halloween cookies, sugar cookies, cat cookies, Halloween treats, easy Halloween cookies, decorated cookies