Love this? Save it for later!
Share the inspiration with your friends
“You’ve gotta try these,” my neighbor texted me one Friday evening, right when I was about to kick back with a cold drink and nothing planned for dinner. Honestly, I was skeptical. Stuffed mini peppers wrapped in bacon sounded a little too fancy for my usual lazy night snacks. But curiosity got the better of me, and I rummaged through my fridge to see what I could whip up.
The smell of sizzling bacon filled my kitchen moments later, mixing with the sweet, vibrant aroma of roasted mini peppers. That first crispy bite? Game changer. The cream cheese inside was so smooth and tangy, perfectly balancing the smoky crunch of the bacon and the subtle sweetness of the peppers. It was one of those accidental wins that made me pause mid-chew and think, “Why have I not been making these all along?”
Since that night, these crispy bacon-wrapped cream cheese stuffed mini peppers have become my go-to for quick appetizers when friends drop by unannounced or when I just want to treat myself without fuss. What started as a casual experiment turned into a mini obsession — I found myself making several batches in one week, tweaking the filling here and there (sometimes adding a sprinkle of smoked paprika, sometimes a dash of fresh herbs) but never straying far from the original magic combo.
There’s something about the way these little bites hit all the right notes: crunchy, creamy, smoky, and sweet. They’re simple enough to feel approachable, but fancy enough to impress, which is a rare combo in my kitchen. And honestly, they bring a little unexpected joy to those quiet nights when you just want something cozy but not too heavy.
So, if you’re wondering why this recipe has stuck with me, it’s because it’s that rare snack that feels like a small celebration every time you make it — no matter how hectic or ordinary your day has been.
Why You’ll Love This Crispy Bacon-Wrapped Cream Cheese Mini Peppers Recipe
From countless kitchen trials and friendly gatherings, this recipe has proven to be a reliable crowd-pleaser. Here’s why it quickly became a staple in my recipe box:
- Quick & Easy: These come together in about 30 minutes, including prep and cooking—perfect when you need a fast appetizer without sacrificing flavor.
- Simple Ingredients: No obscure items here. You probably have cream cheese, bacon, and mini peppers in your fridge or pantry already.
- Perfect for Parties and Casual Snacking: Whether you’re hosting a game night or just craving a satisfying bite, these are always a hit.
- Crowd-Pleaser: Kids love the sweetness of the peppers, while adults enjoy the savory bacon and cream cheese combo.
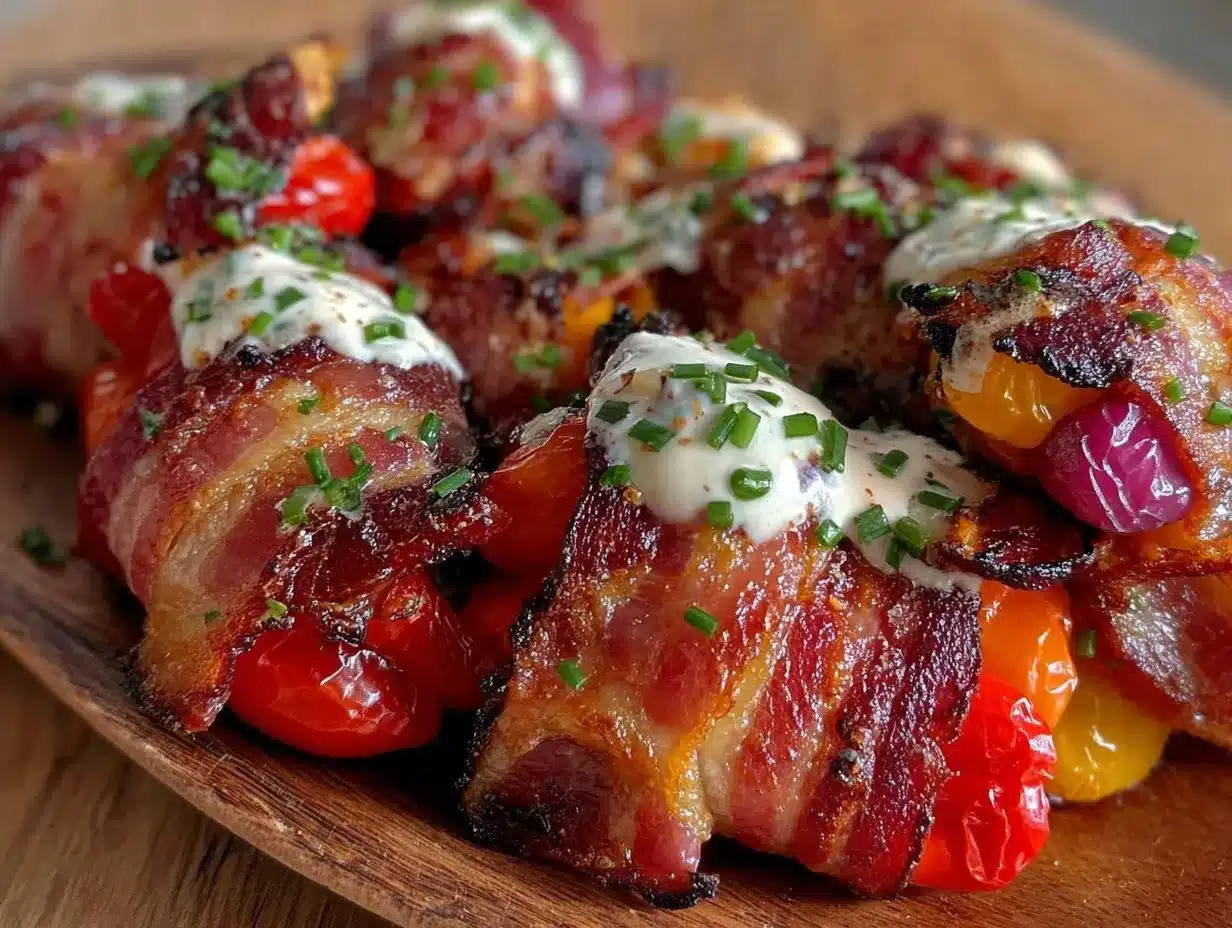
- Unbelievably Delicious Texture: The crisp bacon wrapping contrasts beautifully with the creamy filling and tender pepper, making each bite a little adventure.
What sets this recipe apart is the balance of flavors and textures — no one element overwhelms the others. The cream cheese filling is seasoned just right, but not too heavy, and wrapping each pepper in bacon adds a smoky, salty crunch that’s downright addictive.
Also, I appreciate how versatile the filling can be — sometimes I add fresh chives for a hint of oniony brightness, or a pinch of cayenne for a gentle kick. This isn’t just another bacon-wrapped appetizer; it’s one I’ve refined through many kitchen experiments to hit that sweet spot of comfort and indulgence.
It’s the kind of recipe that lifts the mood instantly — perfect for those evenings when you want to impress without stress. Honestly, if you find yourself craving something that hits all the right notes, this might just become your new obsession.
What Ingredients You Will Need
This recipe uses simple, wholesome ingredients to deliver bold flavor and satisfying texture without the fuss. Most are pantry staples, making it easy to pull together last minute, and you’ll find the mini peppers add a fresh pop of color and sweetness that brightens the whole bite.
- Mini Sweet Peppers (about 20–25): Choose firm, brightly colored ones for the best crunch and sweetness.
- Cream Cheese (8 oz / 225 g, softened): I prefer full-fat for richness, but you can use light if you want to cut calories.
- Bacon (10–12 slices): Thin-cut works best to wrap easily; I like using Applegate Natural Bacon for its smoky flavor without additives.
- Garlic Powder (1 tsp): Adds subtle savory depth without overpowering.
- Onion Powder (½ tsp): Balances the garlic with gentle sweetness.
- Fresh Chives (2 tbsp, chopped, optional): Brightens the cream cheese filling with mild onion notes.
- Black Pepper (to taste): Freshly ground for a little kick.
- Smoked Paprika (optional, ¼ tsp): For a smoky warmth that complements the bacon.
Substitution tips: Swap cream cheese for a dairy-free version if needed, and use turkey bacon for a leaner option. If mini sweet peppers aren’t available, small jalapeños work well for a bit of spice.
Equipment Needed
Here’s what you’ll want on hand to make these bacon-wrapped mini peppers without hassle:
- Baking Sheet: A rimmed sheet works best to catch drips and keep everything in place.
- Parchment Paper or Silicone Baking Mat: Keeps the bacon from sticking, making cleanup a breeze.
- Mixing Bowl: To blend the cream cheese and seasonings smoothly.
- Knife and Cutting Board: For chopping chives and prepping peppers.
- Toothpicks (optional): Useful to secure bacon if it doesn’t wrap tightly.
If you don’t have a baking sheet, an oven-safe skillet can work for roasting, but keep an eye on space to avoid overcrowding. For crispier bacon, I sometimes finish the peppers under the broiler for the last 2 minutes — just don’t wander off!
Preparation Method
- Preheat your oven to 400°F (200°C). Line a baking sheet with parchment paper or a silicone mat to prevent sticking and make cleanup easier.
- Prepare the mini peppers: Wash and dry thoroughly. Cut each pepper in half lengthwise, removing seeds and membranes carefully to make room for filling. The peppers should hold their shape but be hollow enough to stuff.
- Make the cream cheese filling: In a mixing bowl, combine 8 oz (225 g) softened cream cheese, 1 tsp garlic powder, ½ tsp onion powder, 2 tbsp chopped fresh chives (if using), ¼ tsp smoked paprika (optional), and freshly ground black pepper to taste. Stir until smooth and well blended.
- Fill the peppers: Using a small spoon or piping bag, stuff each pepper half generously with the cream cheese mixture. Don’t overfill to avoid spillage during cooking.
- Wrap the peppers: Cut bacon slices in half if they’re too long. Wrap each stuffed pepper half snugly with a bacon strip, securing with a toothpick if needed. The bacon should cover most of the pepper’s opening to hold the filling inside.
- Arrange on the baking sheet: Place the bacon-wrapped peppers seam-side down, leaving a bit of space between each for even cooking.
- Bake for 20–25 minutes: Until the bacon is crispy and browned, and the cheese filling is bubbly. Keep an eye starting around 18 minutes, as oven temperatures vary. If you want extra crispiness, broil for 1–2 minutes—watch closely to avoid burning.
- Remove and cool slightly: Let the mini peppers rest for 5 minutes before serving to let the cheese set up and avoid burning your mouth (trust me on this!).
Pro tip: If your bacon isn’t crisping evenly, rotate the baking sheet halfway through cooking. Also, using thin-cut bacon helps it cook through without drying out the filling.
Cooking Tips & Techniques
Getting those bacon-wrapped cream cheese stuffed mini peppers just right takes a few small tricks I picked up after some trial and error:
- Room temperature cream cheese is key: It blends smoothly with seasonings and fills the peppers easily without lumps.
- Don’t overcrowd the baking sheet: Give the peppers space so heat circulates and bacon crisps properly instead of steaming.
- Thin bacon works best: Thick-cut often needs longer cooking, which can dry out the filling or burn the peppers.
- Secure the bacon with toothpicks if it slips: This prevents unraveling and keeps the pepper sealed.
- Watch your oven closely: Bacon can go from perfectly crispy to burnt fast, especially under the broiler.
- Try resting the peppers on a wire rack over the baking sheet: This lets excess fat drip away and ensures even crisping on all sides.
- Experiment with flavor layers: Adding herbs like thyme or spices like smoked paprika in the cheese gives a nuanced kick.
Honestly, the first few times I made these, I was impatient and ended up with chewy bacon or leaking cheese. Now I pace myself and keep a close eye on the oven — the results are worth it every time. These cooking tips make a noticeable difference if you want consistent, mouthwatering results.
Variations & Adaptations
This recipe is wonderfully flexible, so you can adjust it to suit your taste or dietary needs without losing that signature flavor.
- Spicy Twist: Add finely diced jalapeño or a pinch of cayenne pepper to the cream cheese for heat that complements the sweetness of the mini peppers.
- Herbed Cheese: Swap chives for fresh dill, basil, or parsley to shift the flavor profile toward bright and fresh.
- Cheese Swap: Use goat cheese or feta blended with cream cheese for tangier filling with a creamy texture.
- Gluten-Free Option: This recipe is naturally gluten-free, but double-check bacon labels if gluten sensitivity is a concern.
- Vegetarian Version: Skip the bacon and roast the stuffed peppers topped with a sprinkle of smoked paprika for a smoky flavor, or use vegetarian bacon alternatives.
- Cooking Method: These can be made in an air fryer at 375°F (190°C) for 12–15 minutes for a quicker, crispier finish.
Once, I tried adding a touch of sun-dried tomato pesto into the cream cheese, and it was a delightful surprise—rich, savory, and a little unexpected. Feel free to experiment and make this your own.
Serving & Storage Suggestions
These mini peppers are best served warm, right out of the oven, when the bacon crackles and the cream cheese filling is soft and inviting. They work perfectly as finger food at casual get-togethers, paired with a crisp salad or alongside drinks.
For a fuller spread, I love serving these alongside grilled vegetable skewers or a cool pasta salad to balance the richness.
To store leftovers, place cooled peppers in an airtight container and refrigerate for up to 3 days. Reheat in a 350°F (175°C) oven for 8–10 minutes to crisp the bacon again. Avoid microwaving if possible, as it can make the bacon rubbery.
Flavors tend to mellow and meld overnight, making these even tastier the next day if you can resist eating them all immediately. They also freeze well—wrap individually in parchment and freeze in a sealed bag for up to a month. Reheat straight from frozen for convenience.
Nutritional Information & Benefits
Each crispy bacon-wrapped cream cheese stuffed mini pepper offers approximately:
| Nutrient | Amount per Serving (2 pieces) |
|---|---|
| Calories | 150–180 kcal |
| Protein | 7 g |
| Fat | 13 g (mostly from bacon and cream cheese) |
| Carbohydrates | 3 g |
| Fiber | 1 g |
The mini peppers provide vitamin C and antioxidants, while bacon contributes protein and fat for satiety. Cream cheese adds calcium and a creamy texture but use in moderation if watching saturated fat intake.
This recipe suits low-carb and gluten-free diets naturally. For a lighter version, choose reduced-fat cream cheese and turkey bacon. From a wellness perspective, this appetizer delivers a satisfying bite without overloading on carbs, making it a smart choice for casual entertaining.
Conclusion
These crispy bacon-wrapped cream cheese stuffed mini peppers are a fantastic mix of simple ingredients and big flavors that come together effortlessly. Whether you’re throwing together a quick appetizer for unexpected guests or just craving a cozy snack that feels a little special, these mini peppers fit the bill beautifully.
Feel free to tweak the filling or seasoning to suit your mood — that’s part of what makes this recipe so fun and approachable. I love how easy it is to pull them together and how much they impress every single time.
Try them out, share them with your favorite people, and let me know how you make them your own. There’s a reason these little bites keep showing up in my kitchen — and I think you’ll see why too.
And if you’re looking for other easy crowd-pleasers, you might enjoy the crispy spicy honey BBQ chicken wings or the flavorful deviled eggs with pickled jalapeño, both great for round two at your next gathering.
Frequently Asked Questions
Can I prepare these mini peppers ahead of time?
Yes! You can stuff and wrap the peppers a few hours in advance and keep them refrigerated until ready to bake. Just bake fresh before serving for the best crispiness.
What if I don’t have mini sweet peppers?
Small jalapeños or bell pepper slices can work as substitutes. Adjust the filling amount accordingly, and consider reducing seasoning if using spicy peppers.
Can I make these in an air fryer?
Absolutely! Cook at 375°F (190°C) for 12–15 minutes, checking for bacon crispiness. It’s a faster method that yields great results.
How do I prevent the bacon from unraveling?
Use thin-cut bacon and snugly wrap each pepper. Secure with toothpicks if needed, especially if your bacon slices are thicker or slippery.
Is there a vegetarian version of this appetizer?
Yes, skip the bacon and roast the stuffed mini peppers as-is, or wrap with a vegetarian bacon alternative. Adding smoked paprika can help mimic the smoky flavor.
Pin This Recipe!
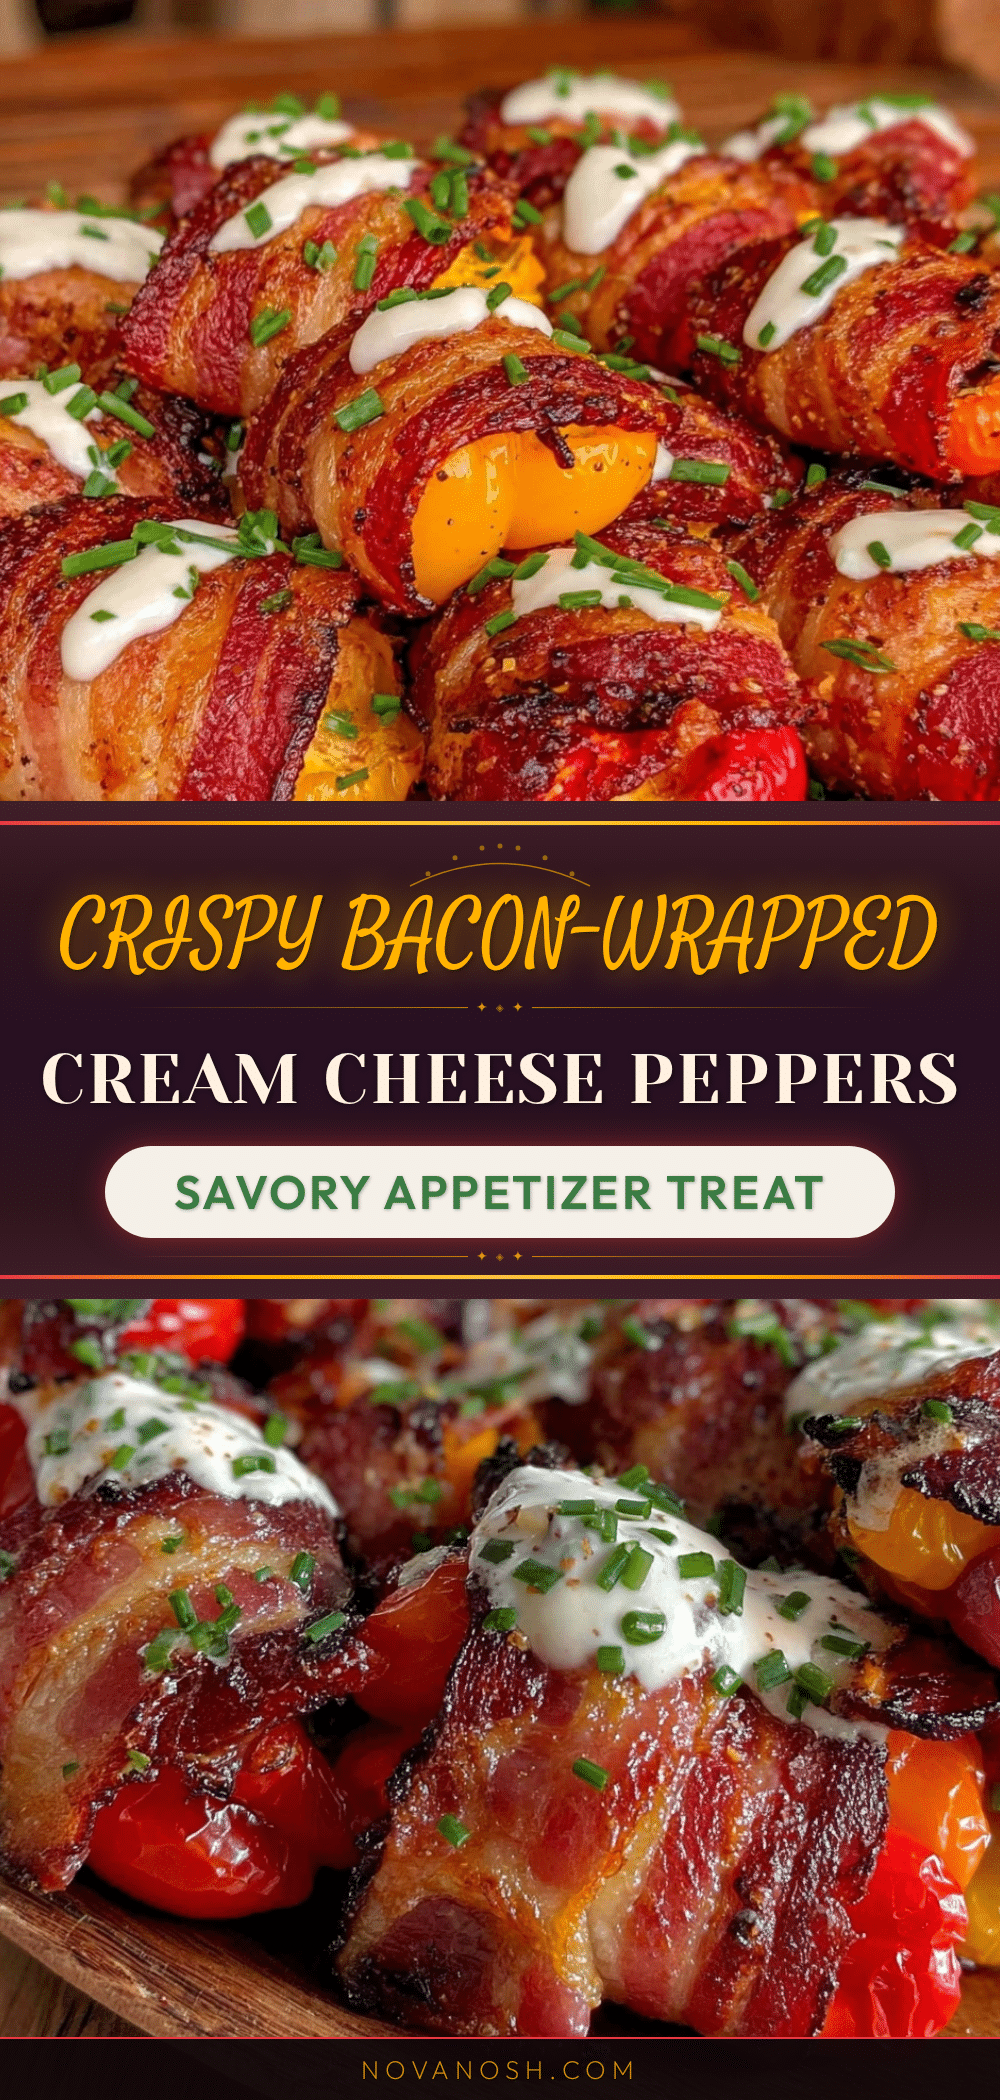
Crispy Bacon-Wrapped Cream Cheese Mini Peppers

These crispy bacon-wrapped cream cheese stuffed mini peppers are a quick and easy appetizer that balances smoky, creamy, and sweet flavors perfectly. Ideal for parties or casual snacking, they deliver a satisfying bite with minimal fuss.
- Prep Time: 10 minutes
- Cook Time: 20–25 minutes
- Total Time: 30–35 minutes
- Yield: 20–25 pieces (about 10–12 servings, 2 pieces per serving) 1x
- Category: Appetizer
- Cuisine: American
Ingredients
- 20–25 mini sweet peppers
- 8 oz (225 g) cream cheese, softened
- 10–12 slices thin-cut bacon
- 1 tsp garlic powder
- ½ tsp onion powder
- 2 tbsp fresh chives, chopped (optional)
- Black pepper, to taste
- ¼ tsp smoked paprika (optional)
Instructions
- Preheat your oven to 400°F (200°C). Line a baking sheet with parchment paper or a silicone mat.
- Wash and dry the mini peppers. Cut each pepper in half lengthwise, removing seeds and membranes.
- In a mixing bowl, combine softened cream cheese, garlic powder, onion powder, chopped chives (if using), smoked paprika (optional), and black pepper. Stir until smooth.
- Stuff each pepper half generously with the cream cheese mixture using a spoon or piping bag.
- Cut bacon slices in half if too long. Wrap each stuffed pepper half with a bacon strip, securing with a toothpick if needed.
- Place the bacon-wrapped peppers seam-side down on the baking sheet, spacing them evenly.
- Bake for 20–25 minutes until bacon is crispy and cheese filling is bubbly. Optionally broil for 1–2 minutes for extra crispiness, watching closely.
- Remove from oven and let rest for 5 minutes before serving.
Notes
Use thin-cut bacon for best results and to avoid drying out the filling. Rotate baking sheet halfway through cooking for even crisping. Let peppers rest 5 minutes after baking to set the cheese. Can be made in an air fryer at 375°F for 12–15 minutes. Store leftovers in airtight container refrigerated up to 3 days; reheat in oven to maintain crispiness. Vegetarian version possible by skipping bacon or using vegetarian bacon alternatives.
Nutrition
- Serving Size: 2 pieces
- Calories: 150180
- Fat: 13
- Carbohydrates: 3
- Fiber: 1
- Protein: 7
Keywords: bacon wrapped, cream cheese, mini peppers, appetizer, party food, easy recipe, crowd pleaser, snack