Love this? Save it for later!
Share the inspiration with your friends
My friend Maria asked me last year if I couldn’t just arrange the cheese board in the shape of a skull instead of carefully layering everything on a platter. I started to explain why that wouldn’t work—something about structural integrity and the way certain cheeses need to breathe. Then I stopped. Honestly, I had no good reason why it wouldn’t work except that I had never seen it done before. So I grabbed a skull-shaped mold from her Halloween decoration bin, lined it with plastic wrap, and started pressing in the cheddar.
Two hours later, we had the most ridiculous, wonderful, slightly terrifying cheese skull sitting on her coffee table. People actually gasped when they walked in. I mean, a regular charcuterie board gets eaten, sure. But a charcuterie skull board? That gets photographed, talked about, and remembered. I accidentally started a tradition that night.
This Best Halloween Dinner Party Charcuterie Skull Board is now my secret weapon for October gatherings. It looks like it took hours of artistic effort, but let me tell you—it’s mostly just pressing things into a mold and getting creative with placement. The whole thing comes together in about twenty minutes of active work. Maybe you’ve been there, staring at Pinterest-perfect Halloween appetizers thinking there’s no way you could pull that off. I promise you, this one is different. It’s the kind of recipe that makes you look like a party planning genius while you’re actually just having fun with your food.
What I love most is how it breaks the ice at parties. People hover around it, pointing out which part is their favorite, debating whether to eat the olive eyeball first. It turns a simple snack into the centerpiece of the evening. And honestly, it’s the one recipe I keep coming back to because it never fails to make people smile—even as they’re biting into a skull-shaped chunk of salami.
Why You’ll Love This Recipe
Let me be real with you—I’ve tested this board at four different parties now, and it gets the same reaction every time. Total silence when people first see it, then a burst of laughter and excited chatter. This isn’t just another cheese platter. It’s a conversation starter, a photo op, and genuinely delicious all at once.
- Quick & Easy: Comes together in under 25 minutes of active prep time. The mold does most of the heavy lifting for you.
- Simple Ingredients: No weird specialty items needed. You can use your favorite cheeses, meats, and whatever crackers you have on hand.
- Perfect for Halloween Parties: Whether it’s a spooky dinner party, a kids’ Halloween gathering, or just a movie night with friends, this board fits right in.
- Crowd-Pleaser: I’ve watched picky eaters and foodies alike hover around this board. There’s something for everyone.
- Unbelievably Delicious: The combination of salty meats, creamy cheeses, and crunchy crackers is classic for a reason. The skull shape just makes it more fun.
What makes this recipe different from every other charcuterie board you’ve seen? It’s the mold technique. Pressing your ingredients into a skull-shaped form creates those clean, dramatic lines that look professionally done. No artistic talent required—just a $10 mold from a craft store or online. Plus, you can customize it based on what your guests actually like to eat. I’ve made versions with all fancy cheeses and versions with nothing but pepperoni and cheddar. Both were devoured completely.
This is the kind of appetizer that makes people close their eyes after the first bite. It’s comfort food dressed up in a costume—familiar flavors presented in a way that feels fresh and exciting. Perfect for impressing your guests without spending your whole day in the kitchen.
Ingredients You Will Need
This recipe uses simple, crowd-pleasing ingredients that you can find at any grocery store. The beauty of a charcuterie skull board is its flexibility—you can swap things based on what your guests like or what you already have on hand.
For the Cheese Base
- Cream cheese, 8 ounces, softened (this acts as the “glue” that holds the skull shape together)
- Sharp cheddar cheese, 8 ounces, shredded (I prefer Tillamook or Cabot for best flavor)
- Monterey Jack cheese, 4 ounces, shredded (adds creaminess without overpowering)
- Garlic powder, 1 teaspoon
- Onion powder, ½ teaspoon
- Worcestershire sauce, 1 tablespoon (adds that savory depth)
- Salt and black pepper, to taste
For the Skull Decoration
- Salami slices, about 20 slices (I use Genoa salami for its rich flavor)
- Pepperoni slices, about 15 slices
- Prosciutto, 4-6 thin slices (optional but adds a fancy touch)
- Black olives, 2 large, pitted (for the eye sockets)
- Cherry tomatoes, 1-2, halved (for the nose cavity)
- Fresh rosemary sprigs, 2-3 (for decorative “hair” or texture)
- Crackers, assorted, about 2 cups (I like a mix of buttery rounds and wheat crackers)
For the Board Surroundings
- Red seedless grapes, 1 cup
- Dried apricots, ½ cup
- Almonds, ½ cup, roasted and salted
- Pickles, small cornichons or gherkins, ½ cup
- Dark chocolate pieces, ¼ cup (a little sweet surprise)
Ingredient Selection Tips: Look for block cheese that you shred yourself rather than pre-shredded bags. The pre-shredded stuff has anti-caking agents that make the cheese mixture less creamy. For the salami, I recommend getting it sliced thick from the deli counter—about ⅛ inch thick works best for holding its shape. If you can’t find a skull-shaped mold, a small round bowl lined with plastic wrap works as a substitute. The shape won’t be as dramatic, but the flavor will still be amazing.
Substitution Guidance: Use dairy-free cream cheese and vegan cheddar shreds for a dairy-free version. Turkey pepperoni and turkey salami work great for a lighter option. If you don’t eat pork, look for beef-based salami or use smoked turkey slices instead. For a gluten-free board, just use gluten-free crackers and check that your Worcestershire sauce is certified gluten-free (Lea & Perrins is a safe bet).
Equipment Needed
The equipment list for this recipe is refreshingly short. You probably already own most of these items.
- Skull-shaped silicone mold, about 6-7 inches wide (available at craft stores or online for around $10-$15)
- Large mixing bowl for combining the cheese mixture
- Cheese grater (if you’re shredding your own cheese)
- Plastic wrap for lining the mold
- Spatula for pressing the cheese mixture into the mold
- Large wooden board or platter, at least 12×16 inches
- Small serving bowls for olives, nuts, and pickles
- Sharp knife for slicing anything that needs trimming
Budget-Friendly Options: If you don’t want to buy a skull mold, use a small round bowl (about 5 inches wide) and shape the cheese mixture into a skull by hand. It won’t have the same dramatic ridges, but it’ll still look great. Alternatively, you can find skull-shaped ice cube trays at dollar stores during October—use two of those and press the cheese mixture in firmly. I’ve done both methods, and honestly, people still go crazy over them.
Maintenance Tip: Silicone molds can pick up odors from strong cheeses. Wash yours immediately after use with hot soapy water, then soak it in a baking soda solution (1 tablespoon baking soda per cup of water) for 15 minutes to neutralize smells. Let it air dry completely before storing.
Preparation Method
This recipe comes together in about 20 minutes of active work, plus at least 2 hours of chilling time. Plan ahead so your skull has time to firm up properly.
- Soften the cream cheese: Take your cream cheese out of the refrigerator about 30 minutes before you start. It needs to be at room temperature so it blends smoothly. If you’re in a hurry, microwave it for 10 seconds at a time until it’s soft but not melted.
- Shred your cheeses: Grate the cheddar and Monterey Jack using the large holes of a box grater. You want about 3 cups total of shredded cheese. I promise, shredding it yourself makes a noticeable difference in texture—the pre-shredded stuff just doesn’t melt into the cream cheese as nicely.
- Make the cheese mixture: In a large mixing bowl, combine the softened cream cheese, shredded cheddar, shredded Monterey Jack, garlic powder, onion powder, Worcestershire sauce, salt, and pepper. Mix everything together with a spatula until it’s completely uniform. The mixture should be thick and slightly sticky, like a firm cookie dough. Taste it and adjust the seasoning if needed—I usually add a little extra black pepper.
- Line your mold: Take your skull-shaped silicone mold and line it completely with plastic wrap. Press the wrap into all the nooks and crannies—the eye sockets, the nose cavity, the jawline. This step is crucial because it lets you unmold the skull cleanly later. Don’t skip it, or you’ll be picking cheese out of those eye sockets for ten minutes.
- Press the cheese mixture in: Scoop the cheese mixture into the lined mold. Start with small handfuls, pressing firmly into the eye sockets and nose cavity first. Then fill the rest of the mold, pressing down hard to eliminate any air pockets. Use the back of a spoon or your fingers to really pack it in. The mixture should be flush with the top of the mold. Smooth the surface with your spatula.
- Chill the skull: Fold the excess plastic wrap over the top of the filled mold. Place the mold on a small plate or baking sheet (in case it leaks) and refrigerate for at least 2 hours, or up to overnight. The longer it chills, the firmer it will be when you unmold it. I usually make mine the night before a party.
- Unmold the skull: When you’re ready to assemble the board, remove the mold from the refrigerator. Peel back the top layer of plastic wrap. Place your serving board upside down over the mold, then carefully flip everything over. Gently peel the silicone mold away from the cheese skull. If it sticks, let it sit at room temperature for 5 minutes—it should release easily. Finally, peel off the plastic wrap. You should have a perfectly shaped cheese skull sitting on your board.
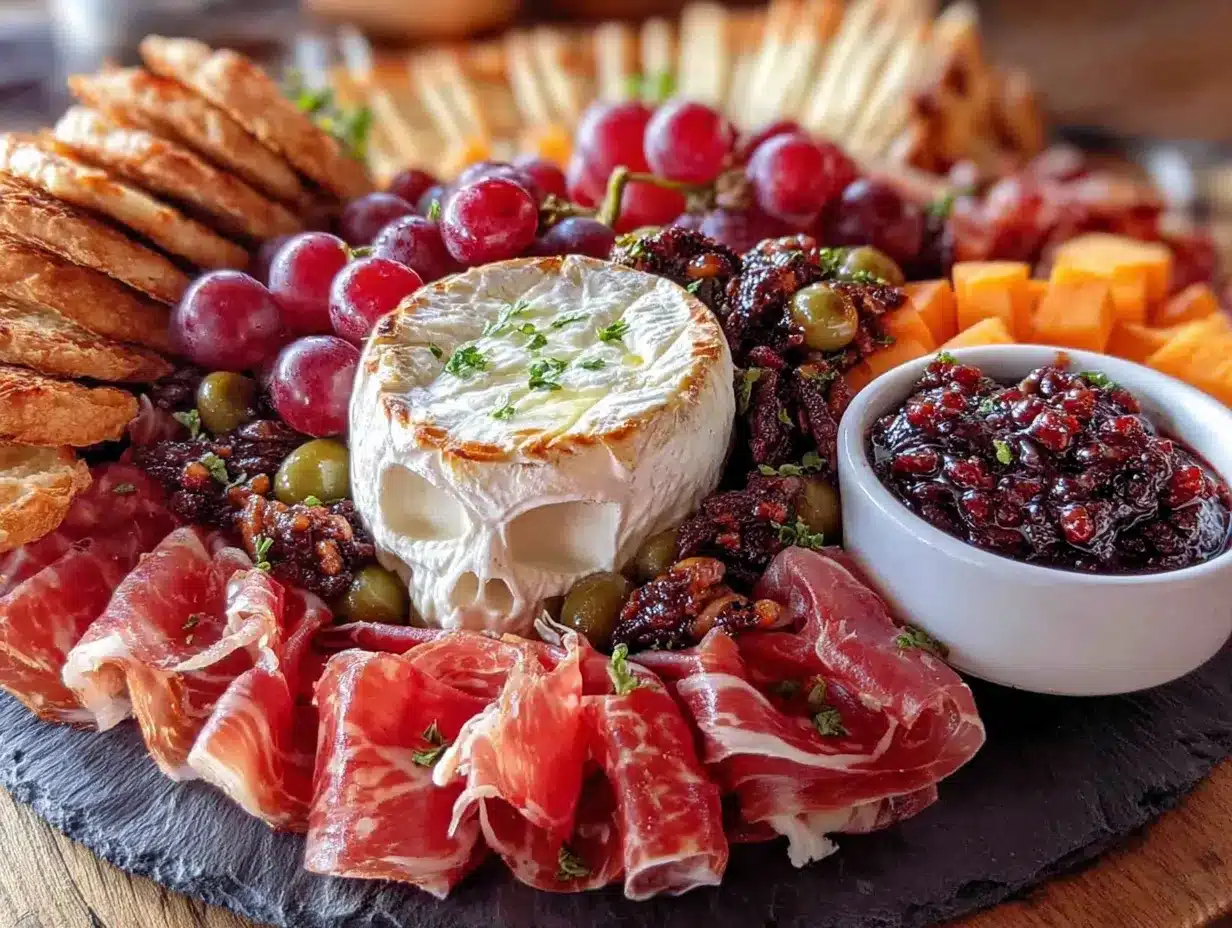
- Decorate the skull: Now the fun part. Place a black olive in each eye socket, pressing gently so it stays in place. Put a halved cherry tomato in the nose cavity, cut side out. Arrange salami and pepperoni slices around the top of the skull like a crown or hair—I like to overlap them slightly for a textured look. Drape prosciutto slices around the sides like flowing locks. Tuck fresh rosemary sprigs in between the meat slices for a spooky, textured effect.
- Fill the board: Arrange your crackers, grapes, dried apricots, almonds, pickles, and dark chocolate pieces around the skull. Leave about 2 inches of space around the skull so it remains the focal point. Fill in any gaps with smaller items like individual almonds or grape halves. The goal is to make the board look abundant and inviting, like there’s a treasure trove of snacks surrounding the skull.
- Serve immediately: This board is best served within an hour of assembly. The cheese skull will be firm but spreadable at room temperature. If you’re not serving right away, keep the skull refrigerated and add the crackers and fruits just before serving to keep everything fresh.
Sensory Cues: When you’re pressing the cheese mixture into the mold, you should feel it compacting under your fingers—there should be no soft spots or air pockets. When you unmold the skull, the surface should be smooth and slightly shiny from the plastic wrap. The olives in the eye sockets should sit flush with the cheese, not sticking out like googly eyes. If they look too prominent, press them in a little deeper or switch to smaller olive pieces.
Cooking Tips & Techniques
I’ve made this skull board about eight times now, and I’ve learned a few tricks the hard way. Let me save you some trouble.
The Cream Cheese Temperature is Everything: The first time I made this, I used cold cream cheese straight from the fridge. The mixture was lumpy and wouldn’t press into the mold properly. It took forever to smooth out, and the final skull had weird bumpy patches. Now I always let my cream cheese sit out for at least 30 minutes. If I forget, I microwave it in 10-second bursts, turning the block over between each one. Soft cream cheese blends like a dream.
Don’t Overmix the Cheese Blend: I know I sound like a broken record, but here’s the thing—overmixing the shredded cheeses into the cream cheese can make the mixture greasy. Fold everything together just until it’s combined. You want visible shreds of cheddar and Monterey Jack throughout the cream cheese, not a homogenous paste. That texture is what makes the skull look like it’s made of actual cheese rather than processed cheese spread.
Chill Time is Non-Negotiable: Two hours is the absolute minimum. I once tried to rush it after just one hour, and the skull collapsed when I tried to unmold it. The cheese mixture was still too soft to hold its shape. Now I aim for at least 4 hours, or overnight if I’m planning ahead. The firmer the skull, the easier it is to decorate without everything sliding around.
Warm Your Knife for Clean Cuts: If you need to trim any uneven edges from the skull after unmolding, run your knife under hot water for a few seconds and dry it off. A warm knife glides through the cheese mixture without dragging or crumbling. This is especially helpful if you want to clean up the jawline or smooth out the top of the skull.
Build in Layers for Visual Interest: When you’re decorating the skull with meats, don’t just lay everything flat. Tuck some salami slices under others, fold prosciutto into loose ribbons, and let pepperoni curl up at the edges. The more texture you create, the more dramatic and professional the board looks. I like to think of it as giving the skull a really fabulous hairstyle made of cured meats.
Variations & Adaptations
One of the best things about this recipe is how endlessly customizable it is. Here are some variations I’ve tried and loved.
Spicy Southwest Version: Replace the cheddar with pepper jack cheese, add 1 teaspoon of cumin and ½ teaspoon of cayenne to the cheese mixture, and use chorizo slices instead of salami. Decorate the board with pickled jalapeños, tortilla chips, and mango chunks instead of grapes. This version has a nice kick that pairs well with margaritas.
Mediterranean Inspired Skull: Use feta cheese crumbles (about 4 ounces) mixed into the cream cheese base instead of cheddar. Add 1 tablespoon of dried oregano and 2 tablespoons of sun-dried tomato paste to the mixture. Decorate with kalamata olives in the eye sockets, roasted red pepper strips for the nose, and arrange the board with pita chips, hummus, cucumber slices, and marinated artichoke hearts.
Kid-Friendly Sweet Version: Make a sweet cheese ball instead of savory. Mix 8 ounces of cream cheese with 4 ounces of marshmallow fluff, ½ cup of mini chocolate chips, and 1 teaspoon of vanilla extract. Shape it in the skull mold as directed. Decorate with candy eyeballs, a chocolate chip nose, and arrange the board with graham crackers, strawberries, pretzel sticks, and gummy worms. My nephew’s eyes practically popped out of his head when he saw this version.
Low-Carb/Keto Adaptation: Use full-fat cream cheese and add extra shredded cheese to keep the carb count low. Skip the crackers entirely and surround the skull with cucumber rounds, bell pepper strips, celery sticks, and pork rinds. Add extra nuts and cheese cubes to fill out the board. This version is surprisingly satisfying and keeps you in ketosis while still enjoying the Halloween fun.
Vegan Version: Use plant-based cream cheese (I like Kite Hill or Miyoko’s) and vegan cheddar shreds. Add 2 tablespoons of nutritional yeast to the mixture for that cheesy flavor. Use vegan salami slices (Yves or Tofurky make good options) and arrange the board with vegan crackers, fresh vegetables, and dairy-free dark chocolate. I tested this version for a vegan friend’s party, and even the meat-eaters went back for seconds.
Serving & Storage Suggestions
This charcuterie skull board is best served at room temperature, so plan to take it out of the refrigerator about 20 minutes before your guests arrive. The cheese mixture softens slightly and becomes perfectly spreadable, while the meats and crackers stay fresh and crisp.
Presentation Tips: Place the board on a dark surface if possible—a black tablecloth or dark wooden table makes the colors pop. Add a few battery-operated tea lights around the board for a spooky glow. I like to scatter a few fake spider webs and plastic spiders around the edges for extra Halloween atmosphere. Just make sure they don’t actually touch the food.
What to Serve With It: This board pairs beautifully with a bold red wine like Malbec or Zinfandel. For non-alcoholic options, sparkling apple cider or a dark grape juice works well. If you’re serving this as part of a Halloween dinner party, follow it with a hearty soup or chili. The board serves as a fantastic appetizer that gets everyone mingling.
Storage Instructions: If you have leftovers (which honestly doesn’t happen often), remove any fresh fruits and vegetables from the board and store them separately. Wrap the cheese skull tightly in plastic wrap and refrigerate for up to 3 days. The meats can be stored in an airtight container in the refrigerator for up to 5 days. Crackers should be stored in a sealed bag at room temperature to maintain their crunch.
Reheating Notes: This is a cold dish, so there’s no reheating involved. However, if you’re using the sweet version with marshmallow fluff, you might want to let it sit at room temperature for 10 minutes before serving so it’s soft enough to spread. The savory version gets better as it sits—the flavors meld together overnight, making leftovers even more delicious the next day.
Flavor Development: The cheese mixture actually develops more depth of flavor after a day in the refrigerator. The garlic and onion powders meld with the Worcestershire sauce, creating a more complex savory profile. If you’re making this for a party, I recommend preparing the cheese mixture and molding it the day before. Just add the decorations and surrounding ingredients right before serving.
Nutritional Information & Benefits
This charcuterie skull board is definitely a treat, but it does offer some nutritional benefits worth noting.
Estimated Nutritional Values (per serving, based on 12 servings):
Calories: 320 | Protein: 14g | Fat: 24g | Carbohydrates: 12g | Fiber: 2g | Sugar: 6g | Sodium: 680mg
Health Benefits of Key Ingredients: The cheese provides calcium and protein, which support bone health and muscle function. Almonds offer healthy monounsaturated fats and vitamin E, a powerful antioxidant. Grapes contain resveratrol, which has been linked to heart health benefits. Dark chocolate (if you include it) provides flavonoids that may support cardiovascular health.
Dietary Considerations: This recipe is naturally low-carb and can be made gluten-free with the right cracker choices. It’s not suitable for vegans in its original form, but the vegan variation mentioned above works beautifully. The recipe contains dairy, gluten (if using regular crackers), and possible sulfites in the dried apricots. If you have guests with allergies, label any allergen-containing items clearly.
My Wellness Perspective: I believe in balance. This board is indulgent, yes, but it’s also made with real, whole ingredients. The protein from the cheese and meats helps keep you satisfied, and the variety of textures and flavors means you’re likely to eat slowly and mindfully. Plus, the social aspect of sharing food with friends has proven mental health benefits. So go ahead and enjoy it—your body and your spirit will thank you.
Conclusion
This Best Halloween Dinner Party Charcuterie Skull Board has become my go-to for every October gathering, and I think it’s about to become yours too. It’s the perfect combination of impressive and achievable—the kind of recipe that makes people think you spent hours when you really just pressed cheese into a mold and threw some crackers around it.
What I love most is how adaptable it is. You can make it fancy with prosciutto and aged gouda, or keep it simple with pepperoni and cheddar. You can go savory, spicy, sweet, or vegan. The skull shape does all the heavy lifting, and your personal taste does the rest. Don’t be afraid to experiment with different cheese combinations or decoration ideas. The first time I made this, I used green olives in the eye sockets and it looked like a zombie skull—my guests loved it even more.
I’d love to hear how your skull board turns out. Did you try a fun variation? Did your guests freak out when they saw it? Drop a comment below and share your creation—I read every single one and I’m always looking for new ideas to try. And if you’re planning a full Halloween menu, don’t miss our spooky Halloween soup recipes that pair perfectly with this board. Happy haunting, and happy eating!
Frequently Asked Questions
Can I make this charcuterie skull board ahead of time?
Absolutely! You can prepare the cheese mixture and press it into the mold up to 2 days in advance. Just keep it wrapped tightly in the refrigerator. Add the decorations and surrounding ingredients no more than 2 hours before serving to keep everything fresh and crisp.
What if I don’t have a skull-shaped mold?
No problem! Use a small round bowl (about 5-6 inches wide) lined with plastic wrap. Press the cheese mixture in firmly, chill it, then unmold it onto your board. Shape it into a rough skull by hand using a butter knife or spatula. It won’t be as detailed, but it’ll still look festive and taste just as good.
How many people does this board serve?
This recipe serves about 10-12 people as an appetizer. If you’re serving it as part of a larger meal with other appetizers, it can stretch to 15-20 people. For a smaller gathering, you can easily halve the recipe and use a smaller mold or bowl.
Can I use pre-shredded cheese from a bag?
You can, but I don’t recommend it. Pre-shredded cheese contains anti-caking agents like potato starch and cellulose powder, which prevent the cheese from blending smoothly into the cream cheese. Your skull might end up with a grainy texture. Shredding your own cheese takes 5 extra minutes and makes a noticeable difference.
How do I transport this board to a party?
Transport the cheese skull separately from the board. Keep it in the mold, wrapped in plastic, and place it in a small cooler with an ice pack. Assemble the board at your destination. This prevents the skull from sliding around during transit and keeps everything looking perfect when you arrive.
Pin This Recipe!
Best Easy Halloween Charcuterie Skull Board
This spooky yet simple charcuterie skull board is made by pressing a cheese mixture into a skull-shaped mold, then decorating with meats, olives, and crackers. It comes together in about 20 minutes of active work and is the perfect conversation-starting centerpiece for any Halloween gathering.
- Prep Time: 20 minutes
- Cook Time: 0 minutes
- Total Time: 2 hours 20 minutes (includes 2 hours chilling)
- Yield: 12 servings 1x
- Category: Appetizer
- Cuisine: American
Ingredients
- 8 ounces cream cheese, softened
- 8 ounces sharp cheddar cheese, shredded
- 4 ounces Monterey Jack cheese, shredded
- 1 teaspoon garlic powder
- ½ teaspoon onion powder
- 1 tablespoon Worcestershire sauce
- Salt and black pepper, to taste
- 20 slices salami (Genoa recommended)
- 15 slices pepperoni
- 4–6 thin slices prosciutto (optional)
- 2 large black olives, pitted
- 1–2 cherry tomatoes, halved
- 2–3 fresh rosemary sprigs
- 2 cups assorted crackers
- 1 cup red seedless grapes
- ½ cup dried apricots
- ½ cup roasted salted almonds
- ½ cup small cornichons or gherkins
- ¼ cup dark chocolate pieces
Instructions
- Soften the cream cheese: Take your cream cheese out of the refrigerator about 30 minutes before you start. It needs to be at room temperature so it blends smoothly. If you’re in a hurry, microwave it for 10 seconds at a time until it’s soft but not melted.
- Shred your cheeses: Grate the cheddar and Monterey Jack using the large holes of a box grater. You want about 3 cups total of shredded cheese.
- Make the cheese mixture: In a large mixing bowl, combine the softened cream cheese, shredded cheddar, shredded Monterey Jack, garlic powder, onion powder, Worcestershire sauce, salt, and pepper. Mix everything together with a spatula until it’s completely uniform. The mixture should be thick and slightly sticky, like a firm cookie dough. Taste it and adjust the seasoning if needed.
- Line your mold: Take your skull-shaped silicone mold and line it completely with plastic wrap. Press the wrap into all the nooks and crannies—the eye sockets, the nose cavity, the jawline.
- Press the cheese mixture in: Scoop the cheese mixture into the lined mold. Start with small handfuls, pressing firmly into the eye sockets and nose cavity first. Then fill the rest of the mold, pressing down hard to eliminate any air pockets. Use the back of a spoon or your fingers to really pack it in. The mixture should be flush with the top of the mold. Smooth the surface with your spatula.
- Chill the skull: Fold the excess plastic wrap over the top of the filled mold. Place the mold on a small plate or baking sheet and refrigerate for at least 2 hours, or up to overnight.
- Unmold the skull: When you’re ready to assemble the board, remove the mold from the refrigerator. Peel back the top layer of plastic wrap. Place your serving board upside down over the mold, then carefully flip everything over. Gently peel the silicone mold away from the cheese skull. If it sticks, let it sit at room temperature for 5 minutes—it should release easily. Finally, peel off the plastic wrap.
- Decorate the skull: Place a black olive in each eye socket, pressing gently so it stays in place. Put a halved cherry tomato in the nose cavity, cut side out. Arrange salami and pepperoni slices around the top of the skull like a crown or hair—overlap them slightly for a textured look. Drape prosciutto slices around the sides like flowing locks. Tuck fresh rosemary sprigs in between the meat slices for a spooky, textured effect.
- Fill the board: Arrange your crackers, grapes, dried apricots, almonds, pickles, and dark chocolate pieces around the skull. Leave about 2 inches of space around the skull so it remains the focal point. Fill in any gaps with smaller items like individual almonds or grape halves.
- Serve immediately: This board is best served within an hour of assembly. The cheese skull will be firm but spreadable at room temperature. If you’re not serving right away, keep the skull refrigerated and add the crackers and fruits just before serving to keep everything fresh.
Notes
Let cream cheese soften to room temperature for best blending. Shred your own cheese for a creamier texture. Chill the skull for at least 2 hours (overnight is better) to ensure it holds its shape. If you don’t have a skull mold, use a small round bowl lined with plastic wrap and shape by hand. For a dairy-free version, use vegan cream cheese and cheddar shreds. For a gluten-free board, use gluten-free crackers and check that Worcestershire sauce is certified gluten-free.
Nutrition
- Serving Size: 1 serving (based on
- Calories: 320
- Sugar: 6
- Sodium: 680
- Fat: 24
- Saturated Fat: 12
- Carbohydrates: 12
- Fiber: 2
- Protein: 14
Keywords: Halloween charcuterie board, skull cheese board, spooky appetizer, Halloween party food, easy charcuterie, cheese skull, Halloween snack


