Easy Graveyard Dirt Pudding Cups: Perfect Spooky Halloween Treat
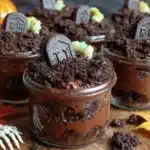
These Easy Graveyard Dirt Pudding Cups are a spooky, no-bake Halloween dessert that comes together in about 20 minutes. Layers of creamy chocolate pudding, crunchy cookie ‘dirt,’ and fun graveyard decorations make them a crowd-pleasing treat for parties.
- Prep Time: 20 minutes
- Cook Time: 0 minutes
- Total Time: 50 minutes
- Yield: 8-10 servings 1x
- Category: Dessert
- Cuisine: American
Ingredients
Scale
- 2 boxes (3.9 oz each) instant chocolate pudding mix
- 3 cups cold whole milk
- 1 teaspoon vanilla extract
- 1 package (14.3 oz) chocolate sandwich cookies (about 24 cookies)
- 4 tablespoons unsalted butter, melted
- 1 cup whipped topping
- 8–10 chocolate wafer cookies or Milano cookies
- Black writing gel or black frosting
- 8–10 gummy worms
- Green food coloring (optional)
- 1 tablespoon coconut flakes (optional)
Instructions
- Make the chocolate pudding: In a medium bowl, whisk together the two boxes of instant chocolate pudding mix and 3 cups of cold whole milk. Whisk vigorously for about 2 minutes until the mixture starts to thicken. Add the vanilla extract and whisk once more. Let it sit for 5 minutes to fully set.
- Crush the cookies into ‘dirt’: While the pudding sets, place all 24 chocolate sandwich cookies (cream filling and all) into your food processor. Pulse about 10-12 times until you get a fine, sandy texture. Pour the crushed cookies into a bowl and stir in the 4 tablespoons of melted butter until everything is evenly moistened.
- Prepare the tombstones: Take your chocolate wafer cookies or Milano cookies and use the black writing gel to write ‘R.I.P.’ on each one. Let the writing dry while you assemble the cups.
- Layer the cups: Spoon about 2 tablespoons of the cookie ‘dirt’ into the bottom of each cup. Press it down gently with the back of the spoon. Next, spoon or pipe about ¼ cup of the chocolate pudding on top of the dirt layer. Add another 2 tablespoons of cookie dirt on top of the pudding.
- Add the whipped topping (optional): If desired, add a dollop of whipped topping between the pudding and the top dirt layer.
- Decorate the graveyard: Gently press one tombstone cookie into the top dirt layer of each cup, angled slightly. Poke a gummy worm or two into the dirt. If using, sprinkle green coconut ‘grass’ around the base of the tombstone.
- Chill until ready to serve: Place the assembled cups in the refrigerator for at least 30 minutes before serving.
Notes
For best results, use whole milk for the pudding. Let the tombstones dry completely before inserting into the cups to prevent smearing. Make extra cookie ‘dirt’ for snacking and topping. These cups can be made up to 2 days ahead; add tombstones and gummy worms just before serving.
Nutrition
- Serving Size: 1 cup
- Calories: 380
- Sugar: 38
- Sodium: 480
- Fat: 18
- Saturated Fat: 10
- Carbohydrates: 52
- Fiber: 2
- Protein: 6
Keywords: Halloween dessert, dirt pudding cups, graveyard pudding, no-bake dessert, spooky treat, chocolate pudding, Oreo dirt