Love this? Save it for later!
Share the inspiration with your friends
I was elbow-deep in packing tape last October, wrestling with a box of Halloween decorations that had somehow multiplied in the attic, when my hand brushed against something soft and crinkly. A half-empty bag of marshmallows, squished flat and forgotten from last year’s baking spree. And just like that, I was eight years old again, standing on a wobbly stool in my neighbor Mrs. Kowalski’s kitchen, her flour-dusted hands guiding mine as we pressed sticky rice cereal mixture into a ghost-shaped cookie cutter. She moved away when I was twelve, but I swear I can still smell that particular mix of butter and vanilla that meant Halloween was officially here.
Honestly, I’d been overthinking Halloween treats for weeks. Pinterest was full of these elaborate cakes that looked like they required a pastry degree and a steady hand I definitely don’t have. I mean, I once tried to pipe frosting and ended up with something that looked like a sad ghost anyway, so maybe that was a sign? But that moment in the attic with the forgotten marshmallows? It hit me. The best Halloween recipes aren’t the complicated ones. They’re the ones that let you actually enjoy the holiday instead of stressing in the kitchen.
So I bought fresh marshmallows, dug out the cookie cutters, and got to work. These Easy Halloween Rice Krispie Ghosts with Chocolate Drizzle are the result — a recipe that tastes like childhood but looks impressive enough to bring to any Halloween party. Maybe you’ve been there, staring at a complicated recipe and wondering if it’s really worth the three-hour cleanup. Trust me, this one is different. It takes about twenty minutes, makes your kitchen smell amazing, and the only hard part is not eating all the chocolate before you drizzle it.
Why You’ll Love This Recipe
I’ve tested this recipe about six times now — yes, six — because I kept eating the “test subjects” before they could be photographed. My neighbor’s kids were my official taste testers, and let me tell you, children are brutally honest critics. They gave these ghosts two sticky thumbs up, which in my book is a higher honor than any food blog award.
- Quick & Easy: From start to finish, you’re looking at about 20 minutes of active time. The hardest part is waiting for the chocolate to set, and even that only takes 15 minutes in the fridge. Perfect for last-minute Halloween cravings or when you realize the school party is tomorrow and you promised to bring treats.
- Simple Ingredients: You probably already have butter, marshmallows, and rice cereal in your pantry. The chocolate and candy eyes are easy to find at any grocery store. No fancy baking supplies required — I promise.
- Perfect for Halloween: These little ghosts are the star of any Halloween gathering. Kids love making them, adults love eating them, and they look adorable on a dessert table next to your pumpkin punch or spider cupcakes.
- Crowd-Pleaser: I’ve brought these to three different Halloween parties, and they disappear every single time. Even people who claim they “don’t do sweets” end up grabbing one. Or three.
- Unbelievably Delicious: There’s something magical about that classic rice cereal treat texture — chewy, slightly crispy, buttery — combined with rich chocolate and those cute little candy eyes. It’s comfort food dressed up for a party.
What makes these ghosts different from every other Halloween treat out there? It’s the texture. I figured out that letting the mixture cool for exactly two minutes before shaping makes the ghosts hold their shape without getting rock hard. Plus, the chocolate drizzle isn’t just for looks — it adds that perfect snap when you bite into one. This isn’t just another rice cereal treat recipe. It’s the version that makes people ask for the recipe before they’ve even finished eating.
This recipe is the kind that makes you feel like a kitchen hero without actually having to do anything complicated. It’s Halloween fun without the Halloween stress. And honestly? That first bite, with the chocolate melting against the chewy cereal and the little eyes staring up at you? Pure joy.
What Ingredients You Will Need
This recipe keeps things simple, using basic pantry staples to create something that feels special. The ingredients work together to give you that classic rice cereal treat texture with a Halloween twist that’s both fun and delicious.
For the Rice Krispie Ghosts
- 3 tablespoons unsalted butter (adds richness and helps the marshmallows melt smoothly) — I prefer Land O’Lakes for consistent results, but any brand works fine
- 1 package (10 ounces) regular marshmallows (about 40 large marshmallows or 4 cups mini marshmallows) — don’t use mini marshmallows for this, they melt too quickly and can make the mixture greasy
- 6 cups crispy rice cereal (like Kellogg’s Rice Krispies) — the original gives the best texture, but store brands work in a pinch
- 1/4 teaspoon vanilla extract (optional but recommended — it rounds out the sweetness and adds warmth)
- Pinch of salt (trust me on this — it balances the sweetness and makes the flavors pop)
For the Decoration
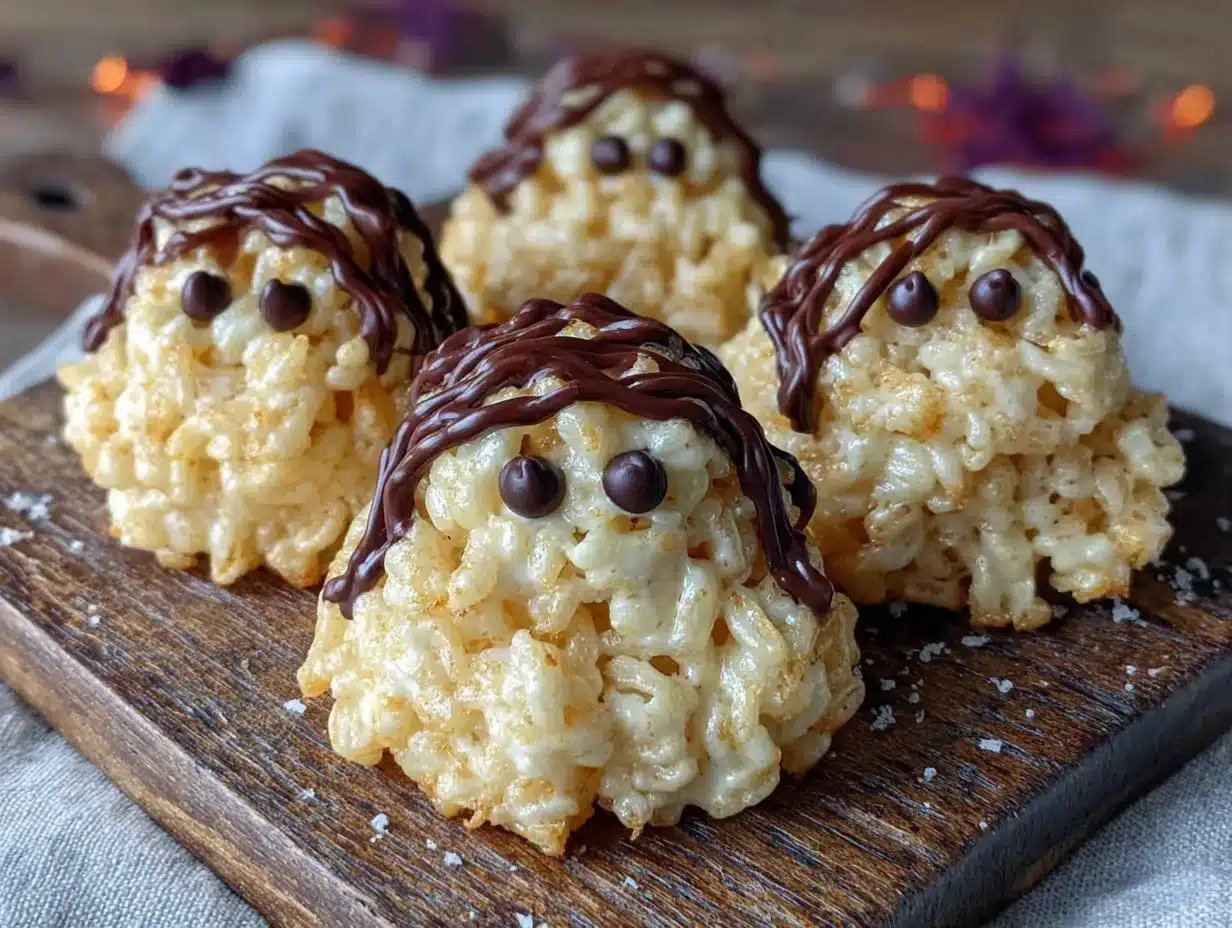
- 1/2 cup semi-sweet chocolate chips (for the drizzle) — I use Ghirardelli because they melt so smoothly, but any good quality chip works
- 1 teaspoon coconut oil or vegetable shortening (helps the chocolate stay shiny and smooth when melted)
- Candy eyes (about 24-30, depending on how many ghosts you make) — you can find these at craft stores or in the baking aisle during Halloween season
Ingredient Selection Tips: When picking marshmallows, look for ones that feel fresh and springy — stale marshmallows won’t melt as smoothly and can leave you with lumps. For the rice cereal, check the expiration date. Fresh cereal gives you that satisfying crunch that makes these treats so addictive. And please, don’t skip the salt. I know it seems weird in a sweet recipe, but it’s the secret to making these taste homemade rather than store-bought.
Substitution Guidance: If you need these to be gluten-free, make sure your rice cereal is certified gluten-free (most brands are, but double-check). You can swap the butter for a plant-based alternative like Earth Balance — just know the texture might be slightly softer. For a dairy-free version, use dairy-free chocolate chips and vegan butter. And if you can’t find candy eyes, no worries — you can pipe little eyes with melted white and dark chocolate, or just skip them entirely. The ghosts will still be adorable.
Equipment Needed
You don’t need a fancy kitchen for this recipe, which is part of the beauty. Here’s what you’ll need:
- Large pot or saucepan (at least 4-quart size — you need room to stir everything together without making a mess)
- Rubber spatula (the silicone kind works best — metal spoons can break the cereal)
- 9×13 inch baking pan (for pressing the mixture) — I’ve used everything from a fancy nonstick pan to an old metal one, and they all work
- Parchment paper (absolute lifesaver — makes cleanup so much easier and prevents sticking)
- Ghost-shaped cookie cutter (about 3-4 inches tall) — I found mine at a dollar store, but any craft store carries them during Halloween
- Small microwave-safe bowl (for melting chocolate)
- Fork or small whisk (for drizzling chocolate)
- Baking sheet (lined with parchment, for setting the finished ghosts)
Personal Experience: I tried using a plastic cookie cutter once, and it was a disaster. The mixture stuck to it like glue, and I ended up with ghost-shaped blobs instead of actual ghosts. Go with a metal cutter if you can — it cuts through cleanly and releases the shapes much easier. And if you don’t have a ghost cutter? No problem. You can shape the mixture into freeform ghosts with your hands, or use any Halloween-shaped cutter you have. Pumpkins, bats, and cats all work beautifully.
Budget-Friendly Options: Don’t have a cookie cutter? Use a small knife to cut the mixture into ghost shapes freehand, or shape them into balls and call them “ghost heads.” Honestly, kids don’t care about perfect shapes. They care about the chocolate and the candy eyes.
Preparation Method
This recipe moves fast once you start, so I recommend having all your ingredients measured and ready to go before you turn on the stove. Trust me on this — I learned the hard way when I was scrambling to find the vanilla while my marshmallows burned.
- Prepare your pan: Line your 9×13 inch baking pan with parchment paper, leaving some overhang on the sides. This makes lifting the finished block out so much easier. Lightly grease the parchment with a tiny bit of butter or nonstick spray.
- Melt the butter: Place your large pot over medium-low heat and add the 3 tablespoons of butter. Let it melt slowly, swirling the pan occasionally. You want it fully melted but not browned — about 2 minutes. The butter should be golden and fragrant, not nutty or dark.
- Melt the marshmallows: Add the entire bag of marshmallows to the melted butter. Stir constantly with your rubber spatula, scraping the bottom and sides of the pot. The marshmallows will start to puff up and then collapse into a gooey, stretchy mess. This takes about 3-4 minutes. Keep stirring — if you stop, the marshmallows can scorch on the bottom. You’ll know they’re ready when the mixture is completely smooth, with no visible marshmallow pieces, and it’s a pale, creamy yellow color.
- Add vanilla and salt: Remove the pot from heat immediately. Stir in the 1/4 teaspoon vanilla and the pinch of salt. The mixture will bubble up a little — that’s normal. Stir until everything is combined, about 30 seconds.
- Add the cereal: Pour in the 6 cups of crispy rice cereal all at once. Fold it into the marshmallow mixture gently but thoroughly. Use a folding motion — cut through the center, scrape the bottom, fold over the top. Repeat until every piece of cereal is coated. This should take about 1-2 minutes. Don’t overmix or the cereal will break into tiny pieces and your ghosts will be crumbly.
- Press into pan: Scrape the mixture into your prepared pan. Here’s the trick — spray your hands lightly with nonstick cooking spray or rub them with a little butter. Then press the mixture evenly into the pan. Don’t press too hard or the treats will be dense and hard. You want them gently packed so they hold together but stay light and airy. Let the mixture cool at room temperature for exactly 15 minutes. Don’t skip this step — too warm and the ghosts won’t hold their shape, too cold and they’ll crack when you cut them.
- Cut the ghosts: After 15 minutes, lift the block out of the pan using the parchment overhang. Place it on a cutting board. Press your ghost cookie cutter firmly into the mixture, then gently lift it straight up. The ghost should release cleanly. If it sticks, your mixture might still be too warm — give it another 5 minutes. Repeat until you’ve cut out as many ghosts as possible. You should get about 8-10 ghosts, depending on the size of your cutter. Gather the scraps and gently press them together to cut out more ghosts. Don’t overwork the scraps or they’ll get tough.
- Melt the chocolate: Place the 1/2 cup chocolate chips and 1 teaspoon coconut oil in a small microwave-safe bowl. Microwave in 20-second intervals, stirring between each, until the chocolate is smooth and glossy. This usually takes about 60-90 seconds total. Be careful not to overheat — chocolate can seize up and turn grainy if it gets too hot.
- Drizzle the chocolate: Dip a fork into the melted chocolate and drizzle it back and forth over the ghosts. You want thin, uneven lines — the imperfection makes them look ghostly and charming. Work quickly before the chocolate sets. If it starts to thicken, pop it back in the microwave for 10 seconds.
- Add the eyes: While the chocolate is still wet, press two candy eyes onto each ghost. Place them close together near the top of the ghost shape. Don’t press too hard or they’ll sink into the treat. Just a gentle push is enough.
- Set the chocolate: Place the decorated ghosts on a parchment-lined baking sheet and refrigerate for 15 minutes, or until the chocolate is firm and set. If you’re in a hurry, you can leave them at room temperature for about 30 minutes instead.
Sensory Cues: When the marshmallows are perfectly melted, the mixture should be thick and stretchy like taffy. When you add the cereal, listen for the satisfying crackle — that’s the sound of freshness. The finished ghosts should feel firm but slightly springy when you touch them. The chocolate drizzle should be glossy and snap cleanly when you bite into it.
Cooking Tips & Techniques
I’ve made these ghosts so many times that I’ve collected a few tricks that make the process smoother and the results better. Here’s what I’ve learned through trial and error — and trust me, there was plenty of error.
The Low and Slow Rule: Keep your heat on medium-low when melting the marshmallows. I know it’s tempting to crank up the heat to speed things up, but high heat will scorch the marshmallows and give you a grainy, unpleasant texture. My first batch tasted like burnt sugar and sadness. Learn from my mistake.
The Two-Minute Cool: After you press the mixture into the pan, let it cool for exactly 15 minutes before cutting. I once got impatient and tried cutting at 10 minutes — the ghosts collapsed into sticky blobs. Another time I got distracted and came back at 25 minutes — the mixture was too hard and the ghosts cracked along the edges. Fifteen minutes is the sweet spot.
Keep Your Hands Greased: This cannot be overstated. The mixture is incredibly sticky, and it will cling to everything — your hands, the spatula, the counter, your cat if she gets too close. Keep a small bowl of butter or a spray bottle of nonstick spray nearby and reapply as needed.
The Chocolate Consistency Test: When you’re melting the chocolate, you want it to be thin enough to drizzle but thick enough to hold its shape. If you lift your fork and the chocolate runs off in a steady stream, it’s perfect. If it drips slowly and looks clumpy, add another 1/2 teaspoon of coconut oil and microwave for 10 seconds.
Multitasking Strategy: While the ghosts are cooling after pressing, melt your chocolate and set out the candy eyes. This way, everything is ready to go when it’s time to decorate. I’ve learned that having all your decorating supplies within arm’s reach makes the whole process feel less frantic.
Common Mistake Alert: Don’t skip the salt. I know it seems like a tiny thing, but that pinch of salt makes the sweetness taste rounder and more complex. Without it, these ghosts taste flat and one-dimensional. My friend Sarah made a batch without salt and said they tasted “like sugar and nothing else.” The salt makes them taste like something.
Variations & Adaptations
One of the best things about this recipe is how easy it is to customize. Here are some variations I’ve tried and loved:
White Chocolate Ghosts
Swap the semi-sweet chocolate for white chocolate chips. The white chocolate against the golden cereal creates a softer, more ethereal look — like actual ghostly ghosts. I made these for a Halloween brunch and they looked stunning on a black platter. Just be careful with white chocolate — it burns more easily than dark, so use lower heat and stir constantly.
Spooky Spider Variation
Instead of ghosts, use a round cookie cutter and press eight pretzel sticks into each side before the mixture sets. Add two candy eyes on top, and you’ve got spiders! My nephew’s face lit up when he saw these — he said they were “scary but yummy.” The salty pretzels add a nice contrast to the sweet cereal.
Gluten-Free Adaptation
Use certified gluten-free crispy rice cereal (like Nature’s Path or One Degree Organics). Everything else in the recipe is naturally gluten-free. I’ve tested this version several times, and honestly, I can’t tell the difference. The texture is exactly the same.
Vegan Ghosts
Swap the butter for a plant-based alternative like Earth Balance or Miyoko’s, and use vegan marshmallows (Dandies is my go-to brand). Use dairy-free chocolate chips for the drizzle. The texture is slightly softer than the original, but the flavor is just as good. My vegan friend ate four of these before I could stop her.
Flavor Twist: Peppermint Ghosts
Add 1/4 teaspoon peppermint extract along with the vanilla. The minty flavor pairs beautifully with the chocolate drizzle and gives these ghosts a festive, wintery feel. I made these for a “Halloween in July” party, and they were a hit. Just go easy on the peppermint — a little goes a long way, and too much can make them taste like toothpaste.
Serving & Storage Suggestions
These ghosts are best served at room temperature, which lets the chocolate stay snappy and the cereal stay chewy. Arrange them on a black or orange platter for maximum Halloween effect. I like to scatter a few candy corn or mini pumpkins around them for a festive touch.
Complementary Dishes: These ghosts pair beautifully with a warm mug of apple cider or a pumpkin spice latte. For a Halloween party spread, serve them alongside spider cupcakes, mummy hot dogs, or pumpkin dip with ginger snaps. The sweetness of the ghosts balances nicely with savory or spicy treats.
Storage Instructions: Store the ghosts in an airtight container at room temperature for up to 5 days. Layer them between sheets of parchment paper to prevent them from sticking together. Do not refrigerate them long-term — the refrigerator can make the cereal treats dry and hard. If you need to store them longer, freeze them.
Freezer Tips: These ghosts freeze beautifully. Place them in a single layer on a baking sheet and freeze until solid, about 1 hour. Then transfer them to a freezer-safe bag or container. They’ll keep for up to 3 months. To thaw, let them sit at room temperature for about 30 minutes. The chocolate might look a little cloudy after freezing, but it will clear up as they warm.
Flavor Development: Honestly, these ghosts taste best on the day you make them. The cereal is at its crispiest, the marshmallow is at its chewiest, and the chocolate is at its shiniest. That said, they’re still delicious on day two and three — just slightly softer. I’ve never had any last past day three in my house, so I can’t speak to day four.
Nutritional Information & Benefits
Let’s be real — these are a treat, not a health food. But here’s the estimated nutritional breakdown per ghost (based on 10 ghosts per batch):
| Nutrient | Amount per Ghost |
|---|---|
| Calories | 195 |
| Total Fat | 7g |
| Saturated Fat | 4g |
| Carbohydrates | 33g |
| Sugar | 18g |
| Protein | 2g |
| Sodium | 135mg |
Health Benefits: On the bright side, the crispy rice cereal provides some iron and B vitamins, and the dark chocolate contains antioxidants. The butter adds a small amount of vitamin A. But honestly? This is a Halloween treat. It’s meant to be enjoyed in moderation, shared with friends, and savored without guilt. I believe in balance — eat your vegetables, but also eat your ghost-shaped rice cereal treats.
Dietary Considerations: This recipe contains dairy (butter, chocolate) and is not suitable for vegans unless modified. It can be made gluten-free and nut-free easily. The main allergen concerns are dairy and gluten, so be sure to check your ingredient labels if serving to people with allergies.
Conclusion
These Easy Halloween Rice Krispie Ghosts with Chocolate Drizzle are everything I want in a holiday recipe — simple enough to make with kids, impressive enough to bring to a party, and delicious enough to disappear in minutes. They bring back that feeling of being eight years old in Mrs. Kowalski’s kitchen, but they’re also easy enough for a busy adult to throw together on a Tuesday night.
I love that this recipe leaves room for creativity. Maybe you’ll make them with white chocolate, or add sprinkles, or turn them into spiders instead of ghosts. Maybe you’ll make them with your own kids and start a new Halloween tradition. That’s the beauty of a simple recipe — it becomes yours.
So go ahead, grab a bag of marshmallows and a ghost cookie cutter. Make a mess in your kitchen. Lick the chocolate off your fingers. And when you take that first bite of a chewy, chocolatey, buttery ghost, close your eyes for a second. That’s the taste of Halloween magic.
I’d love to see your ghosts! Tag me in your photos, leave a comment below with your variations, or share your Halloween party spread. Happy haunting, and happy eating!
Frequently Asked Questions
Can I use mini marshmallows instead of regular ones?
You can, but I don’t recommend it for this recipe. Mini marshmallows melt much faster than regular ones, which can make the mixture greasy and harder to work with. Stick with regular marshmallows for the best texture and easiest handling.
Why did my rice cereal treats turn out hard and dense?
This usually happens when you press the mixture too firmly into the pan or when you overcook the marshmallows. You want to press gently — just enough to even out the surface. And keep the heat low when melting the marshmallows. High heat can cause the sugar to crystallize, making the treats hard.
Can I make these ahead of time for a party?
Absolutely! You can make them up to 2 days in advance. Store them in an airtight container at room temperature, layered with parchment paper. If you’re making them more than 2 days ahead, freeze them instead.
My chocolate drizzle is lumpy. What went wrong?
This usually means the chocolate got too hot or a tiny bit of water got into the bowl. Always microwave in short bursts and stir well between each. If your chocolate seizes up, you can try whisking in a teaspoon of warm water or coconut oil to smooth it out.
Can I use a different cookie cutter shape?
Of course! Pumpkins, bats, cats, or even simple circles all work beautifully. Just adjust the size of your cutter to make sure you get enough treats from the batch. Smaller cutters will give you more ghosts, larger cutters will give you fewer but more impressive treats.
Pin This Recipe!

Easy Halloween Rice Krispie Ghosts with Chocolate Drizzle
These Easy Halloween Rice Krispie Ghosts with Chocolate Drizzle are a quick and fun treat that tastes like childhood but looks impressive enough for any Halloween party. Made with simple pantry staples, they come together in about 20 minutes and are perfect for last-minute Halloween cravings or school parties.
- Prep Time: 20 minutes
- Cook Time: 5 minutes
- Total Time: 40 minutes
- Yield: 8-10 ghosts 1x
- Category: Dessert
- Cuisine: American
Ingredients
- 3 tablespoons unsalted butter
- 1 package (10 ounces) regular marshmallows (about 40 large marshmallows or 4 cups mini marshmallows)
- 6 cups crispy rice cereal (like Kellogg’s Rice Krispies)
- 1/4 teaspoon vanilla extract (optional but recommended)
- Pinch of salt
- 1/2 cup semi-sweet chocolate chips
- 1 teaspoon coconut oil or vegetable shortening
- Candy eyes (about 24-30)
Instructions
- Line your 9×13 inch baking pan with parchment paper, leaving some overhang on the sides. Lightly grease the parchment with a tiny bit of butter or nonstick spray.
- Place your large pot over medium-low heat and add the 3 tablespoons of butter. Let it melt slowly, swirling the pan occasionally, until fully melted but not browned (about 2 minutes).
- Add the entire bag of marshmallows to the melted butter. Stir constantly with a rubber spatula until the marshmallows are completely smooth and a pale, creamy yellow color (about 3-4 minutes).
- Remove the pot from heat immediately. Stir in the 1/4 teaspoon vanilla and the pinch of salt until combined (about 30 seconds).
- Pour in the 6 cups of crispy rice cereal all at once. Fold it into the marshmallow mixture gently but thoroughly until every piece of cereal is coated (about 1-2 minutes).
- Scrape the mixture into the prepared pan. Spray your hands lightly with nonstick cooking spray or rub them with a little butter, then press the mixture evenly into the pan. Let it cool at room temperature for exactly 15 minutes.
- After 15 minutes, lift the block out of the pan using the parchment overhang. Place it on a cutting board. Press your ghost cookie cutter firmly into the mixture, then gently lift it straight up. Repeat until you’ve cut out as many ghosts as possible (about 8-10 ghosts).
- Place the 1/2 cup chocolate chips and 1 teaspoon coconut oil in a small microwave-safe bowl. Microwave in 20-second intervals, stirring between each, until the chocolate is smooth and glossy (about 60-90 seconds total).
- Dip a fork into the melted chocolate and drizzle it back and forth over the ghosts in thin, uneven lines.
- While the chocolate is still wet, press two candy eyes onto each ghost, placing them close together near the top.
- Place the decorated ghosts on a parchment-lined baking sheet and refrigerate for 15 minutes, or until the chocolate is firm and set.
Notes
Let the mixture cool for exactly 2 minutes before shaping to help ghosts hold their shape without getting rock hard. Keep your hands greased with butter or nonstick spray to prevent sticking. For best results, use regular marshmallows (not mini) and fresh rice cereal. The salt is essential for balancing sweetness.
Nutrition
- Serving Size: 1 ghost
- Calories: 195
- Sugar: 18
- Sodium: 135
- Fat: 7
- Saturated Fat: 4
- Carbohydrates: 33
- Protein: 2
Keywords: Halloween, Rice Krispie treats, ghosts, chocolate drizzle, easy, kid-friendly, no-bake


