Love this? Save it for later!
Share the inspiration with your friends
My nephew asked why I couldn’t just use the powdered sugar from the pantry instead of buying a new bag for the royal icing. I started to explain why that wouldn’t work — then stopped. He was seven, and honestly, he had a point. The pantry sugar was perfectly good, and I was being a bit of a snob about my baking supplies.
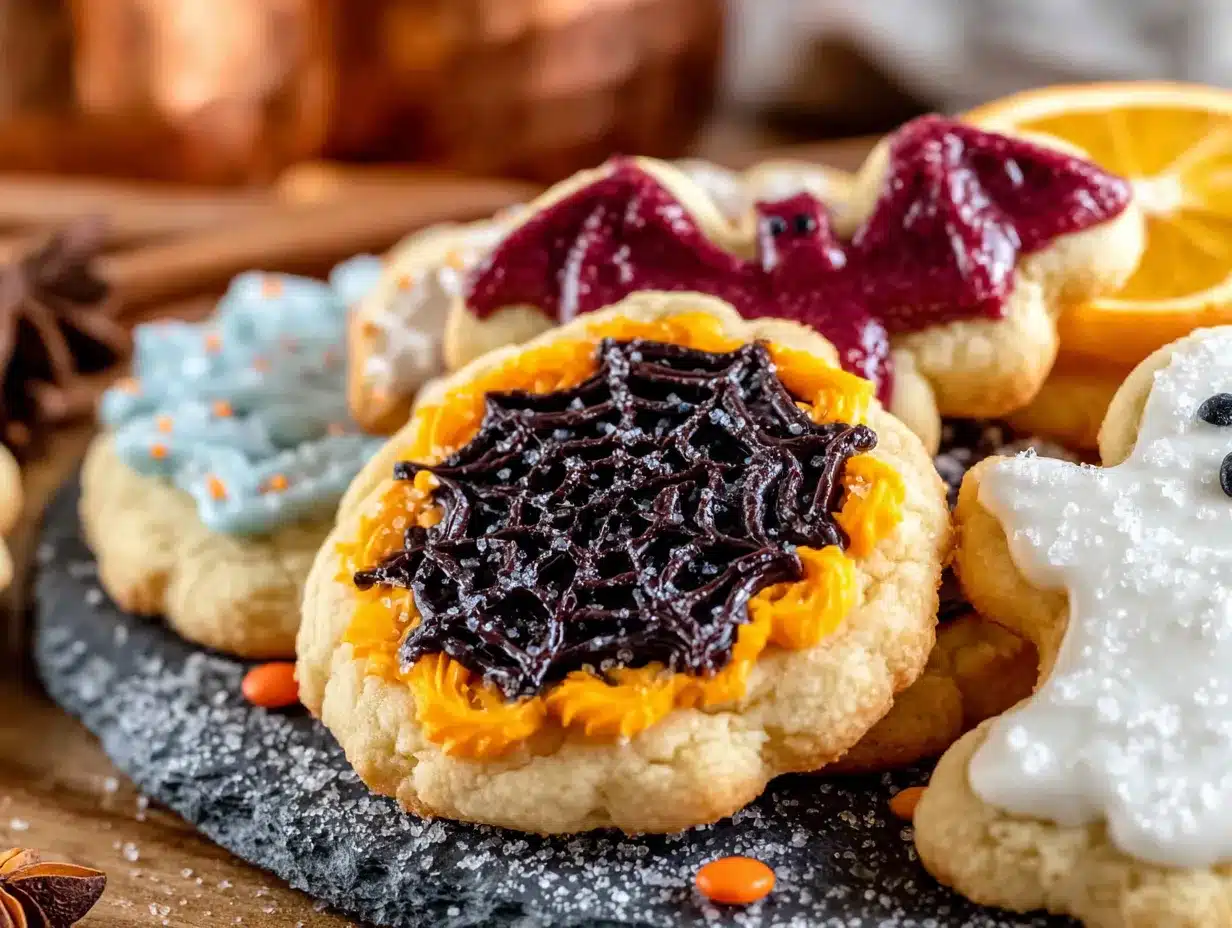
So I tried it. I measured out the powdered sugar, added the meringue powder, and held my breath. That batch of royal icing for my Halloween sugar cookies was, I’m not kidding, the smoothest I’d ever made. The kid was right. I mean, he was completely right, and I’d spent years thinking I needed a specific brand for it to work. Let me tell you, eating that humble pie with a side of perfectly decorated spider web cookies was a moment.
That experience changed how I approach these Easy Royal Icing Halloween Sugar Cookies. Now, I focus on the technique, not the brand names. This recipe is all about getting that glossy, flood-consistency icing without the stress. Maybe you’ve been there — staring at a bowl of icing that’s either too runny or too stiff, wondering where you went wrong. I’ve been there too, and I promise this method is different.
The cookies themselves are a simple, buttery sugar cookie that holds its shape beautifully. No spreading, no puffy edges. Just a crisp, clean canvas for your Halloween creativity. The real magic, though, is in the icing. It dries hard, so you can stack these cookies for parties or gift bags without smudging a single ghost or pumpkin. Honestly, I keep making this recipe because it turns a potentially frustrating project into something genuinely fun. It’s the kind of baking that makes you feel like a pro, even on a Tuesday night with a sink full of dishes.
Why You’ll Love This Recipe
These aren’t just any Halloween cookies. After years of testing — and yes, a few batches that looked more like melted monsters than festive treats — I’ve landed on a version that balances ease with stunning results. Here is why this recipe has become my go-to for every spooky season.
- Quick & Easy: The dough comes together in about 15 minutes, and the icing sets in a few hours. You can break the process over two days if you want, making it perfect for busy October schedules.
- Simple Ingredients: You likely have everything in your pantry right now. Butter, sugar, flour, eggs, and vanilla. No fancy extracts or hard-to-find specialty flours.
- Perfect for Halloween Parties: These cookies are sturdy enough to pack for a school event, a potluck, or a trick-or-treat gathering. They travel well and look impressive on a dessert table.
- Crowd-Pleaser: Kids and adults both love decorating them. It’s an activity and a dessert in one. My neighbor, a professional baker, actually asked for this recipe after trying one at our block party.
- Unbelievably Delicious: The cookie itself is buttery and tender with a slight snap. The royal icing adds a sweet, glossy finish that complements rather than overwhelms the cookie. It’s next-level comfort food dressed up in a Halloween costume.
What makes this recipe different from the rest? It’s the precise ratio of meringue powder to water. That one adjustment gives you an icing that flows like a dream but dries hard enough to stack. It isn’t just another sugar cookie recipe — it’s my best version, tested through countless Halloween seasons and a very opinionated seven-year-old.
This recipe is the kind that makes you close your eyes after the first bite. It’s comfort food reimagined — a little bit spooky, a whole lot of delicious, and completely stress-free. Perfect for impressing guests without the anxiety, or turning a simple Tuesday into a memorable baking session.
What Ingredients You Will Need
This recipe uses simple, wholesome ingredients to create a cookie that is both beautiful and delicious. The list is short, but each ingredient plays a specific role in the final texture and flavor.
For the Sugar Cookies
- Unsalted butter, softened (1 cup / 226g) — I prefer using Kerrygold for its rich flavor, but any good-quality unsalted butter works. Softening it to room temperature is key for a smooth dough.
- Granulated sugar (1 cup / 200g) — Standard white sugar. No need for organic or specialty sugars here.
- Large egg (1) — Room temperature is best. If you forget, place the egg in a bowl of warm water for 5 minutes.
- Vanilla extract (1 teaspoon) — Pure vanilla extract makes a noticeable difference. Imitation works in a pinch, but the flavor will be less rich.
- All-purpose flour (2 ½ cups / 312g) — Spoon and level your flour for accuracy. Scooping directly from the bag can pack in too much flour, leading to dry cookies.
- Baking powder (½ teaspoon) — Helps the cookies spread just a tiny bit for a tender bite. Too much will make them puff up and lose their shape.
- Salt (¼ teaspoon) — Balances the sweetness. I use fine sea salt.
For the Royal Icing
- Powdered sugar (4 cups / 480g) — Sift it if it’s lumpy. This is non-negotiable for a smooth icing.
- Meringue powder (3 tablespoons) — This is the secret to a hard-drying icing. I’ve tested this with Wilton and Genie’s brands, and both work perfectly.
- Warm water (5-6 tablespoons) — Start with 5 tablespoons and add more as needed. The consistency should be like honey — thick but pourable.
- Vanilla extract (½ teaspoon) — Optional, but adds a lovely flavor. If you want pure white icing, use clear vanilla extract.
- Gel food coloring (assorted colors) — Gel colors are concentrated and won’t thin out your icing like liquid food coloring will. I use Americolor for vibrant shades of orange, purple, and green.
Equipment Needed
You don’t need a professional bakery setup for these cookies. Here is what you’ll need, along with some honest notes from my own kitchen.
- Stand mixer or hand mixer — A stand mixer makes creaming butter and sugar effortless, but a hand mixer works just fine. I’ve used both, and the results are identical.
- Rolling pin — A standard rolling pin works. If you have adjustable rolling rings, they help ensure an even thickness. I use a simple wooden pin and just eyeball it.
- Halloween cookie cutters — Ghosts, pumpkins, bats, and cats are my favorites. A set of 4-6 shapes is plenty.
- Baking sheets — Light-colored, rimmed baking sheets are best. Dark sheets can cause the bottoms to brown too quickly.
- Parchment paper or silicone baking mat — Parchment paper is cheap and disposable. Silicone mats are reusable and give a perfectly even bake. Both work well.
- Piping bags or squeeze bottles — Small piping bags with a #2 or #3 tip are great for outlines. Squeeze bottles are easier for flooding (filling in the outlines). I prefer squeeze bottles for the flood consistency — less mess.
- Toothpicks or scribe tool — Essential for popping air bubbles and spreading icing into tight corners. A simple toothpick works wonders.
- Cooling rack — Cookies need to cool completely before icing. A wire rack speeds up the process.
Preparation Method
Let’s walk through this step by step. The process is straightforward, but each step has a little trick that makes the final result much better.
Step 1: Make the Cookie Dough
In the bowl of your stand mixer (or a large bowl with a hand mixer), beat the softened butter and granulated sugar together on medium speed until light and fluffy. This takes about 2-3 minutes. Scrape down the sides of the bowl. Add the egg and vanilla extract, and beat until combined. The mixture should look smooth and creamy.
In a separate bowl, whisk together the all-purpose flour, baking powder, and salt. With the mixer on low, gradually add the dry ingredients to the wet ingredients. Mix just until the dough comes together. Do not overmix — that develops gluten and makes tough cookies. The dough will be soft but not sticky.
Step 2: Chill the Dough
Divide the dough into two discs, wrap each tightly in plastic wrap, and refrigerate for at least 1 hour. Chilling is essential. It firms up the butter, which prevents the cookies from spreading in the oven. I’ve skipped this step before, and the result was a sheet of ghost-shaped blobs. Trust me on the chill.
Step 3: Roll and Cut
Preheat your oven to 350°F (175°C). Line your baking sheets with parchment paper. On a lightly floured surface, roll out one disc of dough to about ¼-inch thickness. I dust my rolling pin with a little flour to prevent sticking. Use your Halloween cookie cutters to cut out shapes. Re-roll the scraps once — rerolling too many times makes the dough tough.
Place the cut cookies about 1 inch apart on the prepared baking sheets. For even baking, keep similar-sized cookies on the same sheet. A small ghost and a large pumpkin will have different bake times.
Step 4: Bake the Cookies
Bake for 8-10 minutes, or until the edges are just barely golden. The centers should look set but not brown. Every oven is different, so start checking at 8 minutes. Let the cookies cool on the baking sheet for 5 minutes, then transfer them to a wire rack to cool completely. Do not attempt to ice warm cookies — the icing will slide right off.
Step 5: Make the Royal Icing
In the bowl of your stand mixer (or a large bowl), combine the powdered sugar and meringue powder. Add 5 tablespoons of warm water and the vanilla extract. Beat on low speed until combined, then increase to medium-high and beat for 4-5 minutes. The icing should be thick, glossy, and hold a stiff peak. If it’s too thick, add water ½ teaspoon at a time. If it’s too thin, add a little more powdered sugar.
Step 6: Color and Thin the Icing
Divide the icing into separate bowls for each color you want. Add gel food coloring a tiny bit at a time until you reach your desired shade. Remember, the color will deepen slightly as the icing dries. For the flood consistency (the icing you’ll use to fill the cookies), add water a few drops at a time until the icing flows like honey. It should settle into a smooth surface within 10-15 seconds after you drizzle it.
Step 7: Decorate the Cookies
Fit a piping bag with a #2 tip and fill it with your outline-consistency icing. Outline each cookie shape. Let the outlines dry for 10-15 minutes. Then, using a squeeze bottle or a piping bag with a slightly larger tip, flood the inside of the outline with the thinner icing. Use a toothpick to spread the icing into the corners and pop any air bubbles. Let the base layer dry completely (2-4 hours) before adding details like dots, stripes, or spider webs.
Cooking Tips & Techniques
Over the years, I’ve learned a few things the hard way. Here are my best tips to save you from the same mistakes.
Don’t skip the chill. I cannot stress this enough. Chilling the dough for at least an hour is what keeps those cute ghost shapes looking like ghosts and not like puffy clouds. One year, I was in a hurry and only chilled the dough for 20 minutes. The cookies spread into each other, and I ended up with a single, enormous blob cookie. It tasted fine, but it wasn’t exactly Halloween-party material.
Consistency is everything with royal icing. The biggest mistake I see is making the icing too thin. If it runs off the cookie like water, it’s ruined. The flood consistency should flow like thick honey — it should hold its shape for a moment before slowly settling. Test it on the back of a spoon. If it drips off in a steady stream, it’s too thin. Add more powdered sugar. If it barely moves, add water a drop at a time.
Work in batches. Don’t try to ice all the cookies at once. Outline a few, flood them, then move to the next batch. If you outline all 30 cookies first, the outlines will be dry by the time you start flooding, and the flood icing won’t blend smoothly. I learned this lesson after a frustrating afternoon of patchy-looking pumpkins.
Use a scribe tool or toothpick for details. For fine lines like spider webs or ghost eyes, a toothpick is actually more precise than a piping tip. Dip the toothpick into the icing and gently drag it across the surface. It gives you incredible control.
Plan your drying time. Royal icing needs 2-4 hours to set, and 6-8 hours to be fully hard. If you’re stacking the cookies, let them dry overnight. I once packed a batch of cookies for a party after only 3 hours, and the icing smudged into a blurry mess. Now, I always make the cookies a day ahead.
Variations & Adaptations
One of the best things about this recipe is how flexible it is. Here are some ways to make it your own.
Gluten-Free Option: Substitute the all-purpose flour with a 1:1 gluten-free baking flour blend. I’ve had good luck with King Arthur Measure for Measure. Add 1 teaspoon of xanthan gum if your blend doesn’t already include it. The dough will be a bit more fragile, so handle it gently.
Dairy-Free Version: Use vegan butter sticks (like Miyoko’s) in place of the unsalted butter. The cookies will be slightly less tender but still delicious. The royal icing is naturally dairy-free, so no changes needed there.
Different Flavors: Swap the vanilla extract for almond extract, lemon extract, or even peppermint extract for a festive twist. For a chocolate version, replace ¼ cup of the flour with unsweetened cocoa powder. The chocolate cookies look especially spooky with orange and green icing.
Seasonal Shapes: This recipe works for any holiday. Use Christmas trees and snowflakes in December, hearts in February, or flowers in spring. The royal icing technique is the same; just change the cookie cutters and colors.
No Meringue Powder? You can make a simple glaze with just powdered sugar and milk or water. It won’t dry as hard, so stacking is risky, but it tastes great. The ratio is 1 cup powdered sugar to 2-3 tablespoons liquid. Adjust as needed.
I once tried a variation with lavender extract for a spring batch of cookies. The flavor was lovely — floral and delicate — but the purple color I used made them look a little… medicinal. Let’s just say my neighbors were polite about eating the “grape” cookies.
Serving & Storage Suggestions
These cookies are best served at room temperature. The royal icing should be fully set and hard to the touch. Arrange them on a platter by color or shape for a striking Halloween display. I like to group all the ghosts together, all the pumpkins together, and create a little spooky scene.
For a Halloween party, pair these cookies with a warm apple cider or a pumpkin spice latte. They also go beautifully with a scoop of vanilla ice cream for a simple dessert. If you’re feeling extra festive, set up a cookie decorating station for guests — it’s always a hit with both kids and adults.
Storage: Once the icing is completely dry, store the cookies in an airtight container at room temperature. Place a sheet of parchment paper between layers to prevent any sticking. They will stay fresh for up to 1 week. Do not refrigerate them — the moisture in the fridge can make the icing sticky and soft.
Freezing: You can freeze the un-iced cookies for up to 3 months. Wrap them tightly in plastic wrap, then place them in a freezer-safe bag. Thaw at room temperature before icing. I do not recommend freezing iced cookies — the icing can crack or become tacky as it thaws.
The flavors actually develop over time. Day-old cookies taste even better — the butter flavor deepens, and the icing sets into a perfect, snappy texture. If you can resist eating them all on day one, you’ll be rewarded on day two.
Nutritional Information & Benefits
These are, let’s be honest, a treat. But here is a rough estimate per cookie (based on a standard 3-inch pumpkin shape with icing).
- Calories: ~180
- Fat: 8g
- Carbohydrates: 26g
- Sugar: 18g
- Protein: 2g
The butter provides a small amount of Vitamin A, and the egg adds a bit of protein. The meringue powder is essentially dried egg whites, so there’s a negligible amount of protein in the icing as well. This recipe is not gluten-free in its standard form, but it can easily be adapted. It contains dairy (butter) and eggs.
From a wellness perspective, I believe in enjoying treats without guilt. These cookies are made with real ingredients — no preservatives, no artificial flavors. When you bake from scratch, you control what goes into your food. That matters to me. Plus, the act of decorating is a form of mindfulness. It forces you to slow down, focus, and create something beautiful. That has its own kind of nutritional value.
Conclusion
These Easy Royal Icing Halloween Sugar Cookies are more than just a recipe — they are a tradition waiting to happen. The buttery cookie, the glossy icing, the joy of creating little edible works of art — it’s all here, wrapped up in a simple, foolproof method. I love this recipe because it makes me feel like a kid again, but it also makes me look like a pro.
I encourage you to make these your own. Use your favorite cookie cutters, experiment with colors, and don’t be afraid to make a mess. The imperfect cookies are often the most charming. And if your ghost ends up looking a little more like a blob? That’s okay. It’s still delicious.
I’d love to hear how your batch turns out. Drop a comment below and tell me about your favorite Halloween shape, or share a photo of your decorated cookies. And if you have a tip that made the process easier, share that too — we’re all learning together in the kitchen. Happy baking, and Happy Halloween!
Frequently Asked Questions
Can I make the dough ahead of time?
Absolutely. You can refrigerate the dough for up to 3 days. Just wrap it tightly in plastic wrap. Let it sit at room temperature for about 10 minutes before rolling, as it will be very firm straight from the fridge.
Why did my cookies spread in the oven?
This usually happens for one of two reasons: the dough wasn’t chilled long enough, or the butter was too soft when you mixed it. Make sure your butter is softened but still cool to the touch, and always chill the cut cookies for at least 15 minutes before baking.
How do I get the royal icing to dry faster?
You can use a fan or a dehydrator set to low heat. Place the cookies in front of a small fan on low speed, and they will dry in about half the normal time. Avoid using an oven, even on the lowest setting, as it can cause the icing to yellow or crack.
Can I use liquid food coloring instead of gel?
You can, but it will thin out your icing. If you use liquid coloring, reduce the water in the recipe by the same amount. Gel colors are much more concentrated and won’t affect the consistency, which is why I recommend them.
How long do the decorated cookies last?
Stored in an airtight container at room temperature, they will stay fresh for up to 1 week. The icing will remain hard and glossy. If you live in a humid climate, add a silica gel packet to the container to prevent the icing from becoming sticky.
Pin This Recipe!

Easy Royal Icing Halloween Sugar Cookies

These buttery sugar cookies hold their shape perfectly and are topped with a glossy royal icing that dries hard, making them ideal for Halloween parties and gift bags. The recipe focuses on technique rather than brand names for a stress-free decorating experience.
- Prep Time: 15 minutes
- Cook Time: 10 minutes
- Total Time: 1 hour 25 minutes (includes 1 hour chilling)
- Yield: 24 cookies 1x
- Category: Dessert
- Cuisine: American
Ingredients
- 1 cup (226g) unsalted butter, softened
- 1 cup (200g) granulated sugar
- 1 large egg, room temperature
- 1 teaspoon vanilla extract
- 2 ½ cups (312g) all-purpose flour
- ½ teaspoon baking powder
- ¼ teaspoon fine sea salt
- 4 cups (480g) powdered sugar, sifted if lumpy
- 3 tablespoons meringue powder
- 5–6 tablespoons warm water
- ½ teaspoon vanilla extract (optional, or clear vanilla for white icing)
- Assorted gel food coloring (e.g., orange, purple, green)
Instructions
- Make the cookie dough: In a stand mixer or large bowl, beat softened butter and granulated sugar on medium speed until light and fluffy, about 2-3 minutes. Scrape down sides. Add egg and vanilla extract; beat until combined and smooth.
- In a separate bowl, whisk together flour, baking powder, and salt. With mixer on low, gradually add dry ingredients to wet ingredients, mixing just until dough comes together. Do not overmix.
- Divide dough into two discs, wrap each tightly in plastic wrap, and refrigerate for at least 1 hour.
- Preheat oven to 350°F (175°C). Line baking sheets with parchment paper.
- On a lightly floured surface, roll out one disc of dough to about ¼-inch thickness. Use Halloween cookie cutters to cut out shapes. Re-roll scraps once.
- Place cut cookies about 1 inch apart on prepared baking sheets. Bake for 8-10 minutes, until edges are just barely golden. Cool on baking sheet for 5 minutes, then transfer to a wire rack to cool completely.
- Make the royal icing: In a stand mixer or large bowl, combine powdered sugar and meringue powder. Add 5 tablespoons warm water and vanilla extract. Beat on low until combined, then increase to medium-high and beat for 4-5 minutes until thick, glossy, and holds a stiff peak. Adjust consistency with additional water or powdered sugar as needed.
- Divide icing into bowls for each color. Add gel food coloring a tiny bit at a time. For flood consistency, add water a few drops at a time until icing flows like honey and settles within 10-15 seconds.
- Decorate: Fit a piping bag with a #2 tip and outline each cookie with outline-consistency icing. Let outlines dry for 10-15 minutes. Then flood inside with thinner icing using a squeeze bottle or piping bag. Use a toothpick to spread icing into corners and pop air bubbles. Let base layer dry completely (2-4 hours) before adding details.
Notes
Chill dough for at least 1 hour to prevent spreading. For royal icing, consistency is key: outline should be stiff, flood should flow like honey. Let icing dry 2-4 hours before stacking. Store in airtight container at room temperature for up to 1 week. Do not refrigerate.
Nutrition
- Serving Size: 1 cookie
- Calories: 180
- Sugar: 18
- Sodium: 60
- Fat: 8
- Saturated Fat: 5
- Carbohydrates: 26
- Protein: 2
Keywords: Halloween sugar cookies, royal icing, easy sugar cookies, decorated cookies, Halloween baking


