Love this? Save it for later!
Share the inspiration with your friends
I was standing in the middle of a grocery store aisle last July, staring at a can of peaches like it held the secrets to the universe. The air conditioning was blasting, someone’s kid was having a meltdown two aisles over, and I was supposed to be buying paper towels. But there it was—that faint, syrupy-sweet smell from the canned fruit section that hit me, and suddenly I was eight years old at my neighbor Mrs. Kowalski’s kitchen table, watching her peel fresh peaches with a paring knife that had to be older than my parents.
Mrs. Kowalski didn’t speak much English, but she didn’t need to. She’d just slide a warm slice of peach cobbler across the table, and I’d forget about the scraped knee or whatever drama happened at recess. I never learned her recipe—I was too busy eating to pay attention. For years, I’ve been trying to chase that same feeling. That perfect mix of buttery crust, soft fruit, and something creamy that made it feel special. Honestly, I’ve made a lot of messes in my kitchen trying to get there.
These Ultimate Peach Cobbler Cheesecake Bars are my best attempt yet. Maybe you’ve been there—that nagging feeling of trying to recreate a taste from your past that you can’t quite name. This recipe is what happens when you stop trying to copy someone else’s magic and just make your own. The peaches get jammy and sweet, the cheesecake layer is so creamy it almost feels unfair, and that crumbly topping? Let me tell you, it’s the kind of thing that makes you close your eyes on the first bite. I keep making these because they feel like summer in a pan, and honestly, I think Mrs. Kowalski would approve.
Why You’ll Love This Recipe
I’ve tested this recipe seven times. Seven. My neighbors have been very patient, and my freezer is full of “experiments.” But this version? This is the one. Here’s why these Ultimate Peach Cobbler Cheesecake Bars are going to become your new favorite dessert:
- Quick & Easy: Comes together in about 30 minutes of active prep time. The oven does the rest of the work while you relax.
- Simple Ingredients: Nothing fancy here. Canned peaches, cream cheese, pantry staples—you probably have most of this already.
- Perfect for Summer Gatherings: Great for barbecues, potlucks, or just a Tuesday night when you need something sweet.
- Crowd-Pleaser: I’ve served these to kids, grandparents, and my picky cousin who “doesn’t like fruit desserts.” They all disappeared.
- Unbelievably Delicious: The contrast between the tangy cheesecake, sweet peaches, and buttery crumble is next-level comfort food.
What makes this recipe different from the rest? It’s the technique of pre-cooking the peaches just enough to concentrate their flavor without turning them into mush. Plus, using a graham cracker crust with a touch of cinnamon gives it that cobbler soul without the fuss of rolling dough. This isn’t just another dessert bar—it’s your new favorite way to eat peaches.
What Ingredients You Will Need
This recipe uses simple, wholesome ingredients to deliver bold flavor and satisfying texture without the fuss. Most of these are pantry staples, which makes this perfect for spontaneous baking cravings.
For the Crust
- Graham cracker crumbs – 1 ½ cups (about 12 full sheets, crushed). I prefer Honey Maid brand for consistent texture.
- Unsalted butter – 6 tablespoons, melted. (Use salted butter and skip the added salt if that’s all you have.)
- Granulated sugar – 2 tablespoons
- Ground cinnamon – ½ teaspoon (adds warmth and pairs beautifully with peaches)
- Salt – A pinch to balance sweetness
For the Cheesecake Layer
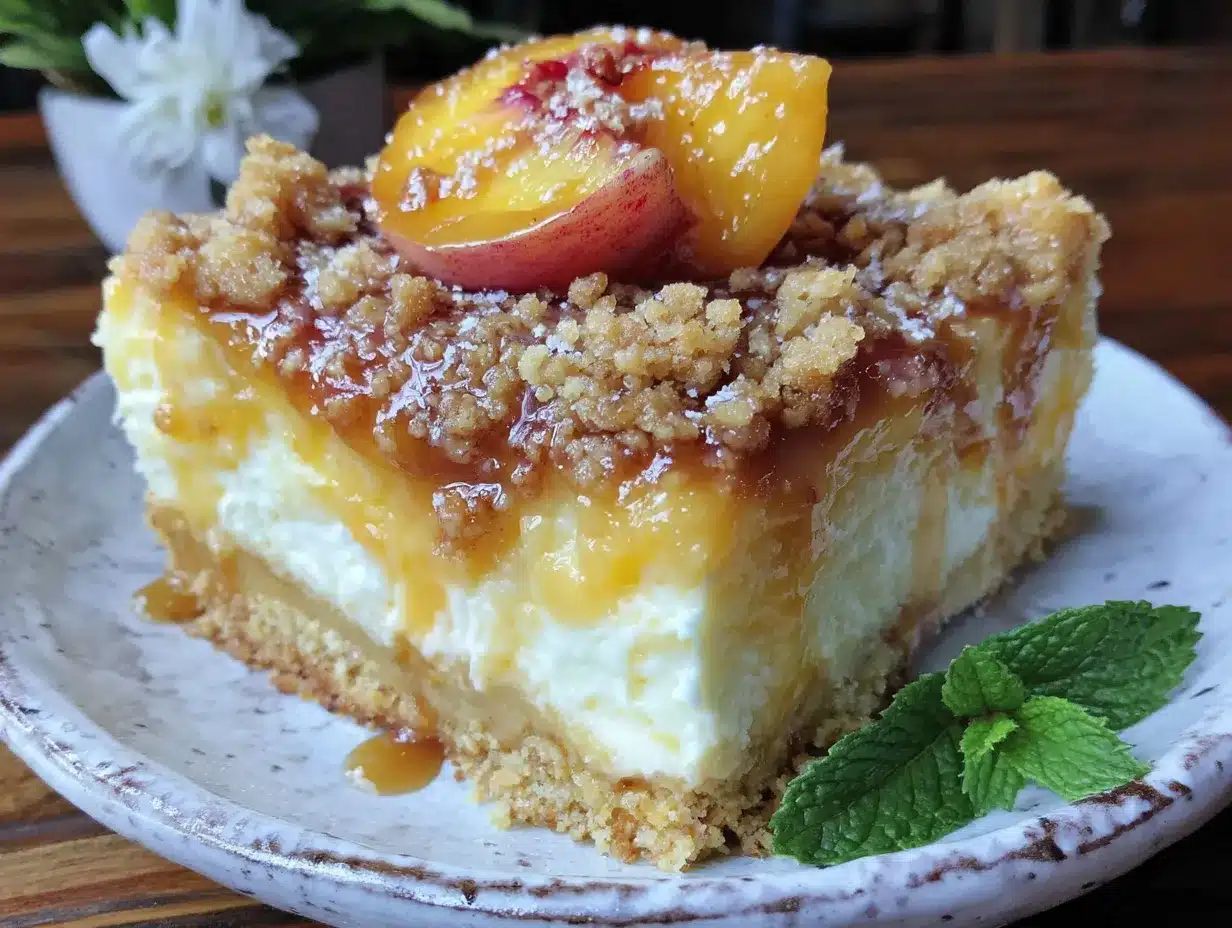
- Cream cheese – 16 ounces (two blocks), softened to room temperature. Philadelphia brand gives the creamiest results.
- Granulated sugar – ¾ cup
- Large eggs – 2, at room temperature (cold eggs can make the batter lumpy)
- Vanilla extract – 1 teaspoon (use pure, not imitation, if possible)
- Sour cream – ¼ cup (adds tanginess and a silky texture)
- All-purpose flour – 2 tablespoons (helps stabilize the cheesecake and prevent cracking)
For the Peach Layer
- Canned peach slices – 2 cans (15 ounces each), drained well. Look for peaches packed in juice, not heavy syrup, for a more natural sweetness.
- Brown sugar – ¼ cup, packed
- Butter – 1 tablespoon
- Lemon juice – 1 teaspoon (brightens the peach flavor)
- Cornstarch – 1 teaspoon mixed with 1 tablespoon water (for thickening)
For the Crumble Topping
- All-purpose flour – ½ cup
- Brown sugar – ¼ cup, packed
- Granulated sugar – 2 tablespoons
- Ground cinnamon – ½ teaspoon
- Cold unsalted butter – 4 tablespoons, cut into small cubes
- Rolled oats – ¼ cup (optional, but adds a nice texture)
Equipment Needed
You don’t need a professional kitchen to make these bars, but having the right tools makes everything smoother. Here’s what you’ll need:
- 9×9-inch baking pan – An 8×8 works too, but your bars will be thicker and may need a few extra minutes in the oven. I use a metal pan for even baking, but glass works fine too.
- Electric mixer – A hand mixer or stand mixer works great for getting the cheesecake layer smooth. A whisk and some elbow grease will also do the job, but your arm might get tired.
- Mixing bowls – You’ll need at least three: one for the crust, one for the cheesecake, and one for the topping.
- Parchment paper – Line your pan with this for easy removal. Trust me, trying to cut these bars without parchment is a sticky nightmare.
- Saucepan – For cooking down the peaches. A small or medium saucepan works perfectly.
- Measuring cups and spoons – Precision matters in baking, even if I’m usually a “pinch of this” kind of cook.
- Spatula – A rubber spatula for scraping every last bit of cheesecake batter. Waste not, want not.
If you don’t have a 9×9 pan, you can use a 9×13 pan—just double the recipe or expect thinner bars with a shorter baking time. I learned that the hard way when I grabbed the wrong pan once. The bars still tasted great, but they were more like cheesecake bark.
Preparation Method
Let’s get baking. I’ll walk you through each step with the little tips I’ve picked up from making these bars more times than I care to admit.
- Preheat and prep: Preheat your oven to 350°F (175°C). Line your 9×9 baking pan with parchment paper, leaving some overhang on two sides. This creates “handles” that make lifting the bars out so much easier later.
- Make the crust: In a medium bowl, combine the graham cracker crumbs, 2 tablespoons sugar, cinnamon, and salt. Pour in the melted butter and stir until the mixture looks like wet sand. Press this firmly into the bottom of your prepared pan. I use the bottom of a measuring cup to really pack it down—this prevents a crumbly crust later. Bake for 10 minutes, then set aside to cool slightly.
- Cook the peaches: While the crust bakes, drain your canned peaches well. In a small saucepan over medium heat, melt 1 tablespoon of butter. Add the peaches, brown sugar, and lemon juice. Cook for about 5 minutes, stirring gently, until the peaches soften and the mixture becomes fragrant. Stir in the cornstarch slurry and cook for another minute until the juices thicken. Remove from heat and let it cool while you make the cheesecake layer.
- Make the cheesecake batter: In a large bowl, beat the softened cream cheese with an electric mixer on medium speed until smooth—about 2 minutes. Scrape down the sides of the bowl. Add the sugar and beat until combined. Add the eggs one at a time, beating on low after each addition just until incorporated. Overbeating adds too much air and can cause cracks. Mix in the vanilla extract, sour cream, and flour until just smooth.
- Assemble the layers: Pour the cheesecake batter over the cooled crust and spread it evenly. Spoon the cooked peaches over the cheesecake layer, distributing them evenly. Don’t worry if some peaches sink slightly—that’s totally fine and actually looks pretty when you cut into the bars.
- Make the crumble topping: In a small bowl, combine the flour, brown sugar, granulated sugar, and cinnamon. Cut in the cold butter cubes using a pastry cutter or your fingertips until the mixture resembles coarse crumbs. Stir in the oats if using. Sprinkle this evenly over the peach layer.
- Bake: Bake for 40-45 minutes, or until the edges are set and the center is slightly jiggly (like a cheesecake should be). The crumble topping should be golden brown. If the top is browning too quickly, tent loosely with foil for the last 10 minutes.
- Cool completely: This is the hardest part. Let the bars cool at room temperature for about an hour, then refrigerate for at least 3 hours (overnight is best). The bars need to be fully chilled to set properly. I once tried to cut them after just an hour, and let me tell you—it was a delicious mess, but a mess nonetheless.
- Cut and serve: Use the parchment handles to lift the bars out of the pan. Use a sharp knife to cut into squares, wiping the blade clean between cuts for neat edges. Serve cold or at room temperature.
Cooking Tips & Techniques
I’ve made every mistake in the book so you don’t have to. Here are the things I wish someone had told me before I started making these Ultimate Peach Cobbler Cheesecake Bars.
Room temperature ingredients matter. I know, I know—every recipe says this. But with cheesecake, it’s non-negotiable. Cold cream cheese creates lumpy batter, and cold eggs can seize the mixture. Leave your cream cheese and eggs on the counter for at least an hour before starting. I’ve forgotten this more times than I’d like to admit, and the texture is never as good.
Don’t overmix the cheesecake batter. Once you add the eggs, mix on low speed and stop as soon as everything comes together. Overmixing incorporates too much air, which causes the cheesecake to puff up and then crack as it cools. A few small cracks are fine—the crumble topping hides them anyway. But big canyon-like cracks? Those are avoidable with gentle mixing.
Drain those peaches well. I cannot stress this enough. If your peaches are too wet, they’ll make the cheesecake layer watery. After draining, I sometimes pat them gently with paper towels. The pre-cooking step also helps remove excess moisture and concentrates the flavor. One time I skipped this step because I was in a hurry, and the bars turned out soggy. Learn from my impatience.
Use a water bath if you’re feeling fancy. For an extra-creamy cheesecake layer, place your baking pan inside a larger pan and pour hot water into the larger pan until it reaches about halfway up the sides of the smaller pan. This creates a steamy environment that prevents cracks. I only do this when I’m trying to impress someone, and honestly, the bars turn out great either way.
Patience with cooling. I know you want to eat these immediately. I get it. But cutting into warm cheesecake bars is like trying to cut through pudding. Let them cool completely at room temperature, then refrigerate for at least 3 hours. Overnight is even better. The flavors meld together, and the texture becomes perfectly creamy. Your patience will be rewarded.
Variations & Adaptations
One of the best things about this recipe is how flexible it is. Here are some ways to make it your own:
Fresh peach version: If peaches are in season, use 3-4 fresh peaches instead of canned. Peel them, slice them, and cook them with the brown sugar and lemon juice for a few extra minutes until they soften. Fresh peaches have less sugar than canned, so you might want to add an extra tablespoon of brown sugar. I tried this last August when my neighbor’s tree was overflowing with peaches, and it was incredible.
Gluten-free option: Substitute the graham crackers with gluten-free graham crackers or crushed gluten-free shortbread cookies. Use a gluten-free all-purpose flour blend (like Bob’s Red Mill) in the cheesecake and crumble topping. The texture will be slightly different, but still delicious. My gluten-intolerant friend devoured an entire pan of these, so I consider it a win.
Berry cobbler cheesecake bars: Swap the peaches for 2 cups of mixed berries (blueberries, raspberries, and blackberries work great). Cook them with the sugar and lemon juice until they break down slightly. The color is gorgeous—a deep purple-red that looks stunning against the pale cheesecake layer.
Spiced-up version: Add ½ teaspoon of nutmeg and ¼ teaspoon of cardamom to the peach mixture. These warm spices complement the peaches beautifully and make the bars taste even more like a classic cobbler. I made this version for a fall gathering, and someone asked me if there was “magic in the recipe.” I took that as a compliment.
Lighter version: Use reduced-fat cream cheese and Greek yogurt instead of sour cream. You can also reduce the sugar in the cheesecake layer to ½ cup. The texture will be slightly less rich, but still satisfying. I’ve made this for healthier cravings, and it hits the spot without the guilt.
Serving & Storage Suggestions
These Ultimate Peach Cobbler Cheesecake Bars are versatile when it comes to serving. Here’s how to make the most of them:
Serving temperature: I prefer them cold straight from the fridge—the cheesecake layer is firm and creamy, and the flavors are clean. But they’re also wonderful at room temperature, especially if you want the peach layer to be a bit more jammy. Try both and see which you prefer.
Presentation ideas: Cut the bars into neat squares and serve on a platter. For a fancier look, drizzle with a little caramel sauce or honey and sprinkle with toasted pecans. A dollop of whipped cream on top never hurts either. I served these at a summer barbecue with a scoop of vanilla ice cream on the side, and people went back for seconds (and thirds).
Storage in the refrigerator: Store the bars in an airtight container in the refrigerator for up to 5 days. Place a layer of parchment paper between stacked bars to prevent them from sticking together. The flavors actually get better after a day or two as everything melds together.
Freezer instructions: These bars freeze beautifully. Wrap individual squares tightly in plastic wrap, then place them in a freezer-safe bag or container. They’ll keep for up to 3 months. To thaw, transfer to the refrigerator overnight or let sit at room temperature for about 30 minutes. I always keep a stash in my freezer for unexpected guests or late-night cravings.
Reheating tips: If you want a warm dessert experience, microwave an individual bar for about 15-20 seconds. The cheesecake will soften slightly, and the peaches will become warm and fragrant. Just don’t overdo it, or the cheesecake can get runny. I learned this the hard way when I nuked a bar for 45 seconds and ended up with peach cheesecake soup. Still tasty, but not very photogenic.
Nutritional Information & Benefits
Let’s be real—these are a treat, not a health food. But knowing what’s in them helps you enjoy them mindfully. Here’s the estimated nutritional breakdown per bar (based on 16 servings):
- Calories: Approximately 320
- Fat: 18g (10g saturated)
- Carbohydrates: 36g (24g sugar)
- Protein: 5g
- Fiber: 1g
- Sodium: 210mg
Now for the silver lining—this dessert does have some redeeming qualities. Peaches are a good source of vitamin C and vitamin A, which support immune function and eye health. Cream cheese provides calcium for strong bones and teeth. And let’s not forget the psychological benefits of eating something that makes you happy—I firmly believe that joy is an important part of a balanced diet.
If you’re watching your sugar intake, you can reduce the sugar in the cheesecake layer and crumble topping by about a third without sacrificing too much flavor. For a lower-fat option, use reduced-fat cream cheese and Greek yogurt. But honestly? Sometimes you just need the real deal, and that’s okay.
Allergen note: This recipe contains dairy, gluten, and eggs. For a dairy-free version, use dairy-free cream cheese and butter alternatives. For egg-free, I haven’t tested it, but a flax egg (1 tablespoon flaxseed meal mixed with 3 tablespoons water) might work in the cheesecake layer—let me know if you try it!
Conclusion
These Ultimate Peach Cobbler Cheesecake Bars are everything I love about summer desserts packed into one neat, portable bar. They’ve got the buttery crumble of a classic cobbler, the creamy richness of cheesecake, and those sweet, jammy peaches that taste like sunshine. I’ve made them for backyard barbecues, holiday dinners, and quiet nights when I needed a little comfort, and they’ve never let me down.
What I love most about this recipe is how forgiving it is. You can use fresh or canned peaches, adjust the sweetness to your liking, or throw in whatever spices you have on hand. It’s a recipe that works with you, not against you. And honestly? That’s the kind of cooking I want to share with you.
I’d love to hear how these turn out for you. Did you try a variation? Did your family fight over the last piece? Drop a comment below and let me know—I read every single one. And if you’re looking for more fruity desserts, you might enjoy these fresh strawberry cake bars or my lemon blueberry crumb bars. Happy baking, friend!
Frequently Asked Questions
Can I use fresh peaches instead of canned?
Absolutely! Use 3-4 ripe fresh peaches, peeled and sliced. Cook them with the brown sugar and lemon juice for about 7-8 minutes until softened. You might need to add a splash of water if they seem dry. The flavor is even better with fresh summer peaches.
Why did my cheesecake layer crack?
This usually happens from overmixing the batter or overbaking. Mix on low speed and stop as soon as the ingredients are combined. Also, bake only until the edges are set and the center is slightly jiggly—it will continue to set as it cools. The crumble topping hides small cracks anyway, so don’t stress too much.
Can I make these bars ahead of time?
Yes, and I actually recommend it! These bars taste even better after a day in the fridge because the flavors have time to meld. You can make them up to 2 days in advance and keep them refrigerated. They’re perfect for party prep.
How do I get clean cuts when slicing the bars?
Use a sharp knife and wipe it clean with a damp paper towel between each cut. Chilling the bars thoroughly (at least 3 hours, preferably overnight) makes a huge difference. For the cleanest cuts, you can even pop them in the freezer for 15 minutes before slicing.
Can I freeze these cheesecake bars?
Yes! Wrap individual bars tightly in plastic wrap, then place them in a freezer-safe bag. They’ll keep for up to 3 months. Thaw in the refrigerator overnight or at room temperature for about 30 minutes. I always keep a few in my freezer for emergencies—you know, those days when you just need a little peach cobbler magic.
Pin This Recipe!
Ultimate Peach Cobbler Cheesecake Bars – Best Easy Dessert
These Ultimate Peach Cobbler Cheesecake Bars combine a buttery graham cracker crust, creamy cheesecake layer, sweet jammy peaches, and a crumbly oat topping. They’re the perfect summer dessert that’s quick, easy, and a guaranteed crowd-pleaser.
- Prep Time: 30 minutes
- Cook Time: 45 minutes
- Total Time: 4 hours 15 minutes (includes chilling)
- Yield: 16 servings 1x
- Category: Dessert
- Cuisine: American
Ingredients
- 1 ½ cups graham cracker crumbs (about 12 full sheets)
- 6 tablespoons unsalted butter, melted
- 2 tablespoons granulated sugar
- ½ teaspoon ground cinnamon
- Pinch of salt
- 16 ounces cream cheese, softened
- ¾ cup granulated sugar
- 2 large eggs, room temperature
- 1 teaspoon vanilla extract
- ¼ cup sour cream
- 2 tablespoons all-purpose flour
- 2 cans (15 ounces each) peach slices, drained
- ¼ cup packed brown sugar
- 1 tablespoon butter
- 1 teaspoon lemon juice
- 1 teaspoon cornstarch mixed with 1 tablespoon water
- ½ cup all-purpose flour
- ¼ cup packed brown sugar
- 2 tablespoons granulated sugar
- ½ teaspoon ground cinnamon
- 4 tablespoons cold unsalted butter, cubed
- ¼ cup rolled oats (optional)
Instructions
- Preheat oven to 350°F (175°C). Line a 9×9-inch baking pan with parchment paper, leaving overhang on two sides.
- In a medium bowl, combine graham cracker crumbs, 2 tablespoons sugar, cinnamon, and salt. Pour in melted butter and stir until mixture resembles wet sand. Press firmly into bottom of prepared pan. Bake for 10 minutes, then set aside to cool slightly.
- Drain canned peaches well. In a small saucepan over medium heat, melt 1 tablespoon butter. Add peaches, brown sugar, and lemon juice. Cook for about 5 minutes, stirring gently, until peaches soften and mixture becomes fragrant. Stir in cornstarch slurry and cook for another minute until juices thicken. Remove from heat and let cool.
- In a large bowl, beat softened cream cheese with an electric mixer on medium speed until smooth, about 2 minutes. Add sugar and beat until combined. Add eggs one at a time, beating on low after each addition. Mix in vanilla extract, sour cream, and flour until just smooth.
- Pour cheesecake batter over cooled crust and spread evenly. Spoon cooked peaches over cheesecake layer, distributing evenly.
- In a small bowl, combine flour, brown sugar, granulated sugar, and cinnamon. Cut in cold butter cubes using a pastry cutter or fingertips until mixture resembles coarse crumbs. Stir in oats if using. Sprinkle evenly over peach layer.
- Bake for 40-45 minutes, until edges are set and center is slightly jiggly. Crumble topping should be golden brown. If browning too quickly, tent loosely with foil for last 10 minutes.
- Cool at room temperature for about 1 hour, then refrigerate for at least 3 hours (overnight is best).
- Use parchment handles to lift bars out of pan. Cut into squares with a sharp knife, wiping blade clean between cuts. Serve cold or at room temperature.
Notes
Room temperature ingredients are crucial for a smooth cheesecake layer. Drain peaches well to avoid a watery cheesecake. For clean cuts, chill bars thoroughly and wipe knife between cuts. Bars can be stored in the refrigerator for up to 5 days or frozen for up to 3 months.
Nutrition
- Serving Size: 1 bar
- Calories: 320
- Sugar: 24
- Sodium: 210
- Fat: 18
- Saturated Fat: 10
- Carbohydrates: 36
- Fiber: 1
- Protein: 5
Keywords: peach cobbler, cheesecake bars, summer dessert, easy dessert, peach dessert, graham cracker crust, crumble topping