Love this? Save it for later!
Share the inspiration with your friends
The Halloween bake sale was in six hours and I’d completely forgotten. I mean, totally blanked on it. I was standing in my kitchen at 7 AM, still in my pajamas, staring at a pantry that held exactly: three eggs, a bag of sugar that was getting low, and some vanilla extract that had definitely seen better days. My neighbor Sarah was bringing her famous caramel apples that she spends two days making. Another mom was doing those elaborate decorated sugar cookies that look like they belong in a bakery window. And me? I had a half-empty bag of sugar and a prayer.
I remembered seeing a recipe for meringue cookies somewhere—light, airy things that looked like little ghosts. Perfect for Halloween, right? But here’s the thing: I’d never made meringue before. Not once. I’d heard horror stories about it being finicky and temperamental. But honestly, at that point, what choice did I have? I was desperate. So I pulled up a basic recipe, crossed my fingers, and started whisking.
The whole process was a comedy of errors, let me tell you. I cracked an egg and got shell in the bowl. I had to fish it out with a bigger piece of shell because I couldn’t find the first one. My mixer made this awful grinding noise because I forgot to put the whisk attachment on properly. But somehow—and I still don’t know how—those little meringues came out perfect. Light, crispy, with these adorable ghost shapes that made everyone at the bake sale lose their minds. I won best in show, and I couldn’t even tell you how it happened. Maybe you’ve been there—the accidental success that makes you look way more put-together than you actually are. These ghost meringue cookies became my go-to Halloween recipe from that day forward, and I keep making them because they’re just that good.
Why You’ll Love This Recipe
These ghost meringue cookies aren’t just cute—they’re genuinely foolproof once you know a few tricks. I’ve tested this recipe at least a dozen times now, tweaking temperatures and ratios to get that perfect light-as-air texture that melts in your mouth. Here’s what makes them stand out:
- Quick & Easy: From start to finish, you’re looking at about 30 minutes of active prep time. The oven does the rest of the work while you clean up or get your Halloween decorations ready.
- Simple Ingredients: You probably have everything already—egg whites, sugar, vanilla, and a pinch of cream of tartar. No fancy grocery trips needed for this one.
- Perfect for Halloween Parties: These little ghosts are the star of any Halloween spread. They’re cute, spooky, and totally kid-friendly.
- Naturally Gluten-Free: Since there’s no flour involved, these work perfectly for guests with gluten sensitivities. Just make sure your vanilla extract is gluten-free too.
- Unbelievably Delicious: The texture is what gets everyone—crispy on the outside, slightly chewy on the inside, with that sweet vanilla flavor that’s just right.
What makes these different from other meringue recipes I’ve tried is the technique. Most recipes tell you to bake them low and slow, but I’ve found that starting with a slightly higher temperature then turning the oven off creates that perfect airy interior without browning the ghosts. It’s a small tweak that makes a huge difference.
Honestly, the first time I made these, I didn’t expect much. I was just trying to avoid showing up empty-handed to that bake sale. But when I saw people’s faces light up—when they bit into one and got that perfect crunch followed by the melt-in-your-mouth center—I knew I’d stumbled onto something special. These cookies are comfort food for the Halloween season: simple, nostalgic, and impossible to resist.
What Ingredients You Will Need
This recipe uses basic pantry staples to create something magical. The ingredients are simple, but each one plays an important role in getting that light, airy texture.
- 4 large egg whites, room temperature (cold eggs don’t whip up as well, so let them sit out for about 30 minutes)
- 1 cup (200g) granulated sugar (regular white sugar works best; don’t use powdered sugar here)
- 1/2 teaspoon cream of tartar (this stabilizes the egg whites and helps them hold their shape)
- 1 teaspoon vanilla extract (I prefer pure vanilla extract over imitation for better flavor)
- Pinch of salt (just a tiny bit to balance the sweetness)
- Mini chocolate chips for eyes (about 1/4 cup, or use black decorating gel if you prefer)
A few notes on ingredient selection: I’ve tried this recipe with different types of sugar, and granulated white sugar really is the best. Brown sugar adds too much moisture and makes the meringues sticky. If you’re using a stand mixer, you’ll want to make sure your bowl is completely clean and dry—any grease will prevent the egg whites from whipping up properly.
For the cream of tartar, you can substitute with 1 teaspoon of lemon juice or white vinegar if you don’t have it on hand. It does the same job of stabilizing the egg whites. I’ve used both options and they work fine, though cream of tartar gives the most consistent results.
The mini chocolate chips are for the ghost eyes. You can also use regular chocolate chips cut in half, or black decorating gel if you want a smoother look. I’ve even used small candy eyes from the baking aisle, which are super cute but a little more expensive.
Equipment Needed
You don’t need much fancy equipment for these ghost meringue cookies, which is part of why I love them. Here’s what you’ll need:
- Electric mixer (stand mixer or hand mixer both work; I’ve used both and prefer my KitchenAid stand mixer for the hands-free convenience)
- Large mixing bowl (glass or metal works best; avoid plastic as it can hold onto grease)
- Piping bag with round tip (or a zip-top bag with the corner snipped off)
- Baking sheet (a light-colored one works best; dark pans can cause browning)
- Parchment paper (don’t skip this—meringues will stick to unlined pans)
- Wire rack for cooling
If you don’t have a piping bag, don’t worry. I’ve made these using a sturdy zip-top bag with the corner snipped off, and they look just as cute. The ghosts might be a little less uniform, but that adds to their charm honestly. For the mixing bowl, make sure it’s super clean—I wipe mine down with a little vinegar on a paper towel to remove any trace of grease before starting.
A good baking sheet makes a difference too. I’ve used cheap ones and they work fine, but the light-colored ones really do help prevent browning. If you only have dark pans, try placing another baking sheet underneath to create a buffer.
Preparation Method
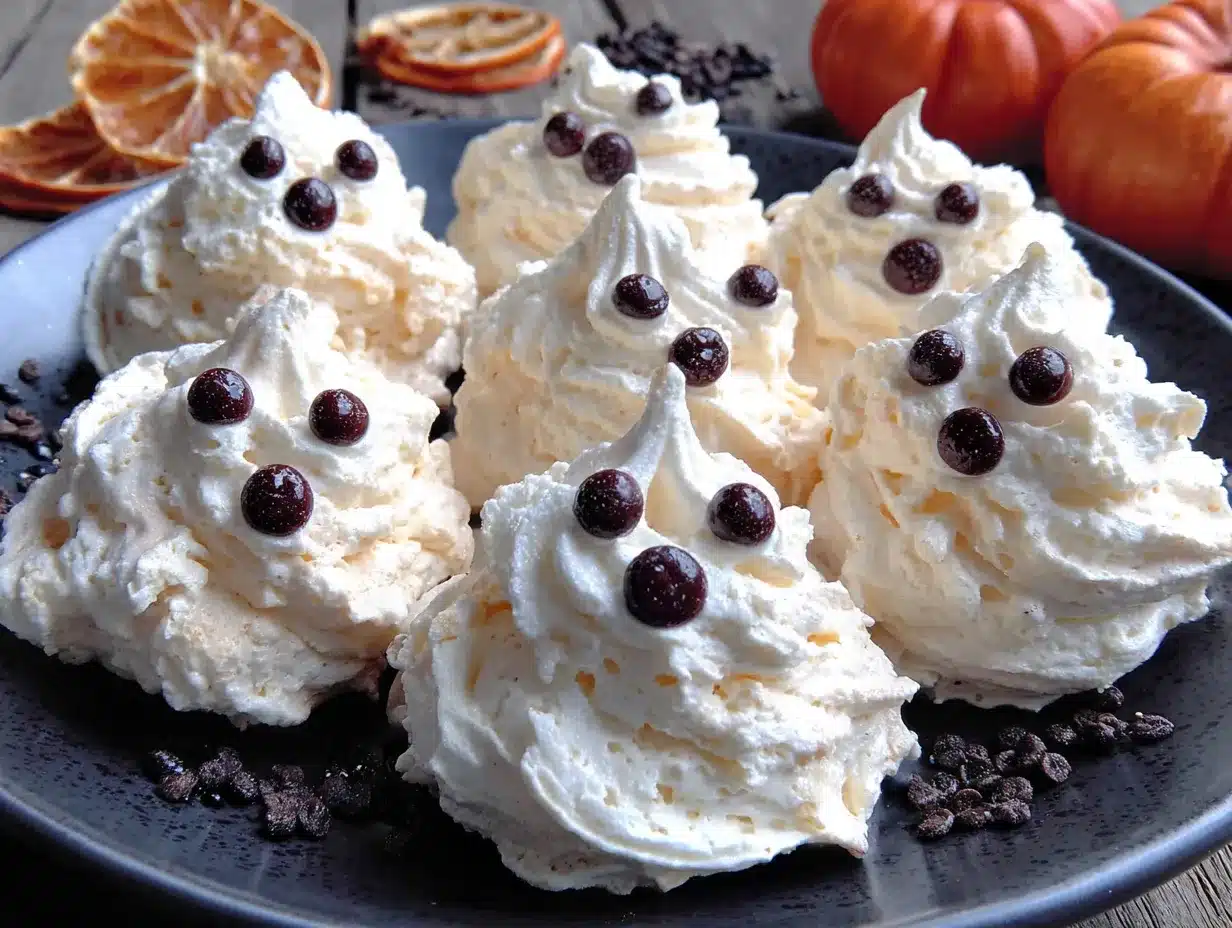
Making these ghost meringue cookies is easier than you think, but there are a few steps where attention to detail really pays off. Follow along and you’ll have adorable little ghosts in no time.
- Preheat your oven to 200°F (95°C). This is important—meringues need low heat to dry out slowly. Line a baking sheet with parchment paper and set aside.
- Separate your eggs carefully. Make sure no yolk gets into the whites—even a tiny bit will prevent them from whipping up properly. I separate each egg into a small bowl first, then add the white to the mixing bowl. That way if one breaks, you don’t ruin the whole batch.
- Add the cream of tartar and salt to the egg whites. Start mixing on medium speed until the mixture becomes frothy and bubbly, about 1-2 minutes. You’ll see it start to turn white and increase in volume.
- Gradually add the sugar. This is the most important step. Add the sugar one tablespoon at a time while the mixer is running on medium-high speed. Wait about 15 seconds between each addition. I know it feels tedious, but this helps the sugar dissolve properly. If you dump it all in at once, your meringue won’t be as stable.
- Continue beating until stiff peaks form. This takes about 5-7 minutes total. You’ll know it’s ready when the mixture is glossy and thick, and when you lift the whisk, the meringue forms a peak that holds its shape without drooping. Rub a little between your fingers—if it feels gritty, keep mixing until the sugar dissolves completely.
- Add the vanilla extract. Beat for another 30 seconds just to incorporate it. Don’t overmix at this point or you risk deflating the meringue.
- Transfer to a piping bag. If using a zip-top bag, snip about 1/2 inch off one corner. I like to twist the top of the bag to push the meringue toward the tip. Hold the bag straight up and down over the baking sheet.
- Pipe ghost shapes. Squeeze a mound of meringue about 2 inches wide, then lift straight up to create a pointy top. The meringue will spread slightly as it bakes, so leave about 1 inch between each ghost. You should get about 24-30 ghosts depending on size.
- Add the eyes. Gently press two mini chocolate chips into each ghost for eyes. Do this right after piping while the meringue is still soft. The chips should sink in slightly but stay visible.
- Bake for 60 minutes. Place the baking sheet in the preheated oven and bake for 1 hour. Don’t open the oven door during this time—the rush of cold air can cause the meringues to crack.
- Turn off the oven and let them cool inside. After 60 minutes, turn off the oven but leave the meringues inside for another 30-60 minutes. This allows them to dry out completely without over-baking. They should peel easily off the parchment paper when done.
- Cool completely on a wire rack. Let them sit for at least 10 minutes before serving or storing. They’ll be delicate at first but firm up as they cool.
A quick tip: if your kitchen is humid, the meringues might take longer to dry out. You can leave them in the turned-off oven overnight if needed—just make sure the oven is completely off and cool before you go to bed.
Cooking Tips & Techniques
After making these ghost meringue cookies more times than I can count, I’ve picked up a few tricks that make the process smoother and the results more consistent. Let me share what I’ve learned the hard way so you don’t have to.
The biggest mistake people make is rushing the sugar addition. I did this my first time—I got impatient and dumped in the sugar all at once. The meringue never got stiff enough, and my ghosts flattened into sad little puddles. Adding sugar slowly gives it time to dissolve properly, which creates that stable structure you need for tall, fluffy ghosts.
Humidity is your enemy. Meringues are basically sugar and egg whites, which means they absorb moisture from the air. If it’s a rainy day, your meringues might turn out sticky or chewy instead of crisp. Try to make these on a dry day if possible. If you can’t avoid humidity, bake them a little longer—add 15-20 minutes to the initial baking time.
Don’t overmix after adding vanilla. I know it’s tempting to keep beating until everything looks perfect, but overmixing can deflate the meringue. Once the vanilla is incorporated, stop. You want the mixture to be glossy and stiff, not dry and clumpy.
Room temperature eggs really do matter. I used to think this was one of those cooking myths, but I tested it side by side. Cold egg whites take much longer to whip up and never get as voluminous. Let your eggs sit out for 30 minutes before starting. If you’re short on time, place them in a bowl of warm water for 5 minutes.
Parchment paper is non-negotiable. I tried using a silicone baking mat once thinking it would work the same way. It didn’t. The meringues stuck and I had to scrape them off in pieces. Wax paper won’t work either—it can melt in the oven. Stick with parchment paper.
For consistent ghost shapes, practice your piping technique on a separate piece of parchment first. Hold the bag straight up, squeeze a mound, then lift quickly. The first few might look a little wonky, but you’ll get the hang of it after 3-4 tries. Imperfect ghosts are actually cuter anyway—they look more like friendly spirits than perfect little blobs.
Variations & Adaptations
One of the best things about this recipe is how easy it is to customize. I’ve tried several variations over the years, and here are my favorites:
Peppermint Ghosts: Swap the vanilla extract for 1/2 teaspoon peppermint extract. The minty flavor pairs perfectly with the sweet meringue, and it gives the cookies a cooling sensation that’s really fun. I made these for a Christmas-themed Halloween party once and they were a hit.
Chocolate-Dipped Ghosts: After the meringues have cooled, dip the bottoms in melted dark chocolate and let them set on parchment paper. The chocolate adds a rich contrast to the light, airy meringue. Plus, it looks like the ghosts are standing in chocolate puddles—so cute!
Vegan Version: You can make these with aquafaba (the liquid from a can of chickpeas) instead of egg whites. Use 3 tablespoons of aquafaba per egg white, and add an extra 1/4 teaspoon cream of tartar. The texture is slightly different—a bit chewier—but still delicious and totally plant-based.
Colorful Ghosts: Add a drop or two of food coloring to the meringue before piping. I’ve made purple ghosts for a spooky vibe and orange ones for a more festive look. Gel food coloring works best because it doesn’t add extra liquid. Just fold it in gently with a spatula.
Flavor Variations: Try almond extract instead of vanilla for a nutty twist, or add a pinch of cinnamon for warmth. I’ve also made these with rose water (use 1/2 teaspoon) for a floral version that feels really elegant. Just be careful with strong extracts—a little goes a long way.
If you’re looking for another easy Halloween treat, these spooky pumpkin cupcakes are perfect for pairing with your ghost cookies. They come together just as quickly and use similar pantry staples.
Serving & Storage Suggestions
These ghost meringue cookies are best served at room temperature, right after they’ve cooled completely. The texture is perfect—crisp on the outside with a slightly marshmallow-y center. I like to arrange them on a platter with some fake spider webs or orange sprinkles for a festive Halloween look.
They pair beautifully with hot chocolate, coffee, or a glass of cold milk. For a Halloween party, I’ve served them alongside creamy Halloween punch and they disappeared within minutes. The light sweetness of the meringue balances out the richness of the punch perfectly.
Storage: Store your ghost meringue cookies in an airtight container at room temperature. They’ll stay fresh for up to 2 weeks—though honestly, they never last that long in my house. Don’t refrigerate them, as the moisture will make them sticky and soft.
Freezing: You can freeze these cookies for up to 3 months. Place them in a single layer in a freezer-safe container with parchment paper between layers. To thaw, let them sit at room temperature for about 30 minutes. They might lose a bit of their crispness, but they’re still delicious.
Reheating: If your meringues have softened a bit from humidity, you can crisp them up by placing them in a 200°F (95°C) oven for 10-15 minutes. Let them cool completely before serving again.
Flavor development: These cookies actually taste better after they’ve sat for a day or two. The flavors mellow and blend together, and the texture becomes more uniform. If you can resist eating them all right away, they’re even better the next day.
Nutritional Information & Benefits
Each ghost meringue cookie (without chocolate chips) contains approximately:
- Calories: 35
- Fat: 0g
- Carbohydrates: 8g
- Sugar: 8g
- Protein: 1g
- Sodium: 10mg
These cookies are naturally low in calories and fat-free, making them a lighter option for Halloween treats. The egg whites provide a small amount of protein, and since there’s no flour or butter, they’re naturally gluten-free and dairy-free.
One thing I appreciate about this recipe is that it uses simple, whole ingredients without any artificial additives or preservatives. You control exactly what goes into them, which is nice when you’re making treats for kids or guests with dietary restrictions.
Just keep in mind that they are still a sugar-based treat, so moderation is key. But honestly, a couple of these light, airy ghosts won’t derail anyone’s healthy eating plan—they’re mostly air!
Conclusion
These ghost meringue cookies have become a Halloween tradition in my house, and I can’t imagine the season without them. They’re the recipe that saved me from showing up empty-handed to that bake sale, and they’ve been saving me ever since. Simple ingredients, easy technique, and results that look like you spent way more effort than you actually did—that’s my favorite kind of recipe.
I hope you give these a try and make them your own. Maybe you’ll add a different extract, or use colorful sprinkles, or find a new way to shape them. That’s the beauty of cooking—everyone brings their own touch. If you do make them, I’d love to hear how they turn out. Drop a comment below and let me know if your ghosts were as cute as mine (or cuter, I won’t be jealous).
And if you’re looking for more Halloween treats to round out your party spread, don’t miss our easy Halloween candy bark or these no-bake pumpkin cheesecake bites. Happy haunting, and happy baking!
Frequently Asked Questions
Why did my meringue cookies turn out sticky?
Sticky meringues usually mean they weren’t baked long enough or the humidity was too high. Try baking them for an additional 15-20 minutes at 200°F, then let them cool completely in the turned-off oven. If the weather is humid, you might need to extend the baking time.
Can I use liquid egg whites from a carton?
I’ve tried this, and honestly, it doesn’t work as well. Carton egg whites are pasteurized differently and don’t whip up to the same volume. Fresh egg whites give you the best results for these ghost meringue cookies. If you must use carton whites, add an extra 1/4 teaspoon of cream of tartar to help stabilize them.
How do I know when stiff peaks have formed?
Lift the whisk attachment straight up out of the meringue. If the peaks stand up straight without drooping, you’re there. If the tips curl over, keep beating for another minute. The mixture should also look glossy and smooth, not grainy or dry.
Can I make these without a piping bag?
Absolutely! Use a sturdy zip-top bag with the corner snipped off, or simply drop spoonfuls of meringue onto the baking sheet for a more rustic ghost shape. They won’t look as uniform, but they’ll taste just as good. You can also shape them with a spatula if you’re feeling creative.
How far in advance can I make these cookies?
You can make them up to 2 weeks ahead of time. Store them in an airtight container at room temperature, away from heat and moisture. They actually keep really well, which makes them perfect for party prep. Just don’t refrigerate them—the moisture in the fridge will ruin the texture.
Pin This Recipe!

Easy Ghost Meringue Cookies: Best Light & Airy Halloween Treat

These ghost meringue cookies are light, airy, and adorable—perfect for Halloween parties. Made with simple ingredients, they’re naturally gluten-free and surprisingly easy to make.
- Prep Time: 30 minutes
- Cook Time: 60 minutes
- Total Time: 2 hours (including cooling time)
- Yield: 24-30 cookies 1x
- Category: Dessert
- Cuisine: American
Ingredients
- 4 large egg whites, room temperature
- 1 cup (200g) granulated sugar
- 1/2 teaspoon cream of tartar
- 1 teaspoon vanilla extract
- Pinch of salt
- 1/4 cup mini chocolate chips (for eyes)
Instructions
- Preheat your oven to 200°F (95°C). Line a baking sheet with parchment paper and set aside.
- Separate your eggs carefully, making sure no yolk gets into the whites.
- Add the cream of tartar and salt to the egg whites. Start mixing on medium speed until frothy and bubbly, about 1-2 minutes.
- Gradually add the sugar one tablespoon at a time while the mixer is running on medium-high speed, waiting about 15 seconds between each addition.
- Continue beating until stiff peaks form, about 5-7 minutes total. The mixture should be glossy and thick, and peaks should hold their shape without drooping.
- Add the vanilla extract and beat for another 30 seconds just to incorporate.
- Transfer the meringue to a piping bag fitted with a round tip (or a zip-top bag with the corner snipped off).
- Pipe ghost shapes onto the prepared baking sheet: squeeze a mound about 2 inches wide, then lift straight up to create a pointy top. Leave about 1 inch between each ghost.
- Gently press two mini chocolate chips into each ghost for eyes while the meringue is still soft.
- Bake for 60 minutes. Do not open the oven door during this time.
- Turn off the oven and let the meringues cool inside for another 30-60 minutes to dry out completely.
- Cool completely on a wire rack for at least 10 minutes before serving or storing.
Notes
For best results, ensure all equipment is clean and grease-free. Room temperature eggs are crucial for proper whipping. If your kitchen is humid, extend baking time by 15-20 minutes. Store in an airtight container at room temperature for up to 2 weeks. Do not refrigerate.
Nutrition
- Serving Size: 1 cookie
- Calories: 35
- Sugar: 8
- Sodium: 10
- Carbohydrates: 8
- Protein: 1
Keywords: ghost meringue cookies, Halloween cookies, meringue cookies, gluten-free Halloween treats, easy Halloween dessert